
MiniMax H3 Plastic Skin Fix for Video Ads: A Realism Workflow
AI Overview
Why can skin look plastic in a MiniMax H3 video ad?
The usual causes are an over-smoothed reference, hard specular lighting, beauty-language overload, or a face that is too small in frame. Diagnose the source image and lighting before adding more prompt adjectives.
What is the fastest practical fix?
Start with one high-resolution, minimally retouched face reference under broad soft light. Keep the action simple, specify visible pores and natural highlight rolloff, then review consecutive frames at full size.
Can a negative prompt remove waxy skin?
It can reduce unwanted styling, but it cannot restore texture missing from the reference or pixels missing from a distant face. Positive, observable instructions and a better source image are more reliable.
Should you repair the result in post or regenerate it?
Regenerate when identity, anatomy, or texture swims between frames. Use finishing tools only for mild contrast, saturation, sharpness, or highlight problems that remain stable throughout the shot.
Why H3 skin can look plastic in ads
Separate model failure from art-direction failure
MiniMax describes H3 as a general multimodal video model with native stereo audio, up to 15-second generation, and output up to 2K. It is positioned for advertising and e-commerce as well as cinematic work. Those capabilities make it useful for a beauty spot, but they do not turn a weak portrait into a credible close-up automatically.
“Plastic skin” is a production description, not an official H3 error code. It usually means the face has lost small variations: pores disappear, cheek highlights become a single bright patch, lips look laminated, or facial texture changes as the head turns. The frame may look polished as a thumbnail yet fail as soon as the subject speaks or moves.
Four inputs commonly create that result. The first is a reference already processed with a beauty filter. The second is hard frontal or double-rim lighting that produces broad, synthetic highlights. The third is prompt language such as “flawless,” “perfect,” “glowing,” and “ultra glossy” stacked together. The fourth is scale: if the face occupies too few pixels, no instruction can recover fine skin information.

Illustrative generated frame: believable skin begins with readable texture, broad light, and restrained styling. It is not presented as an H3 benchmark.
Before changing settings, freeze the current reference, prompt, aspect ratio, duration, and seed where available. Alter one cause at a time. Otherwise a better result will not tell you whether the improvement came from the reference, light, framing, or chance. If the face also loses structure at medium and wide distances, use the distant-face diagnosis guide before treating the problem as surface texture.
Lock the reference before changing the prompt
Choose evidence the model can preserve
A useful reference is not simply a beautiful photograph. It shows the identity and texture you want the video to retain. Prefer a high-resolution three-quarter or front portrait with both eyes visible, a neutral expression, individual eyebrow hairs, real pores, and gentle tonal variation. Avoid baked-in skin blur, aggressive sharpening, blown highlights, heavy foundation, or colored light crossing the face.
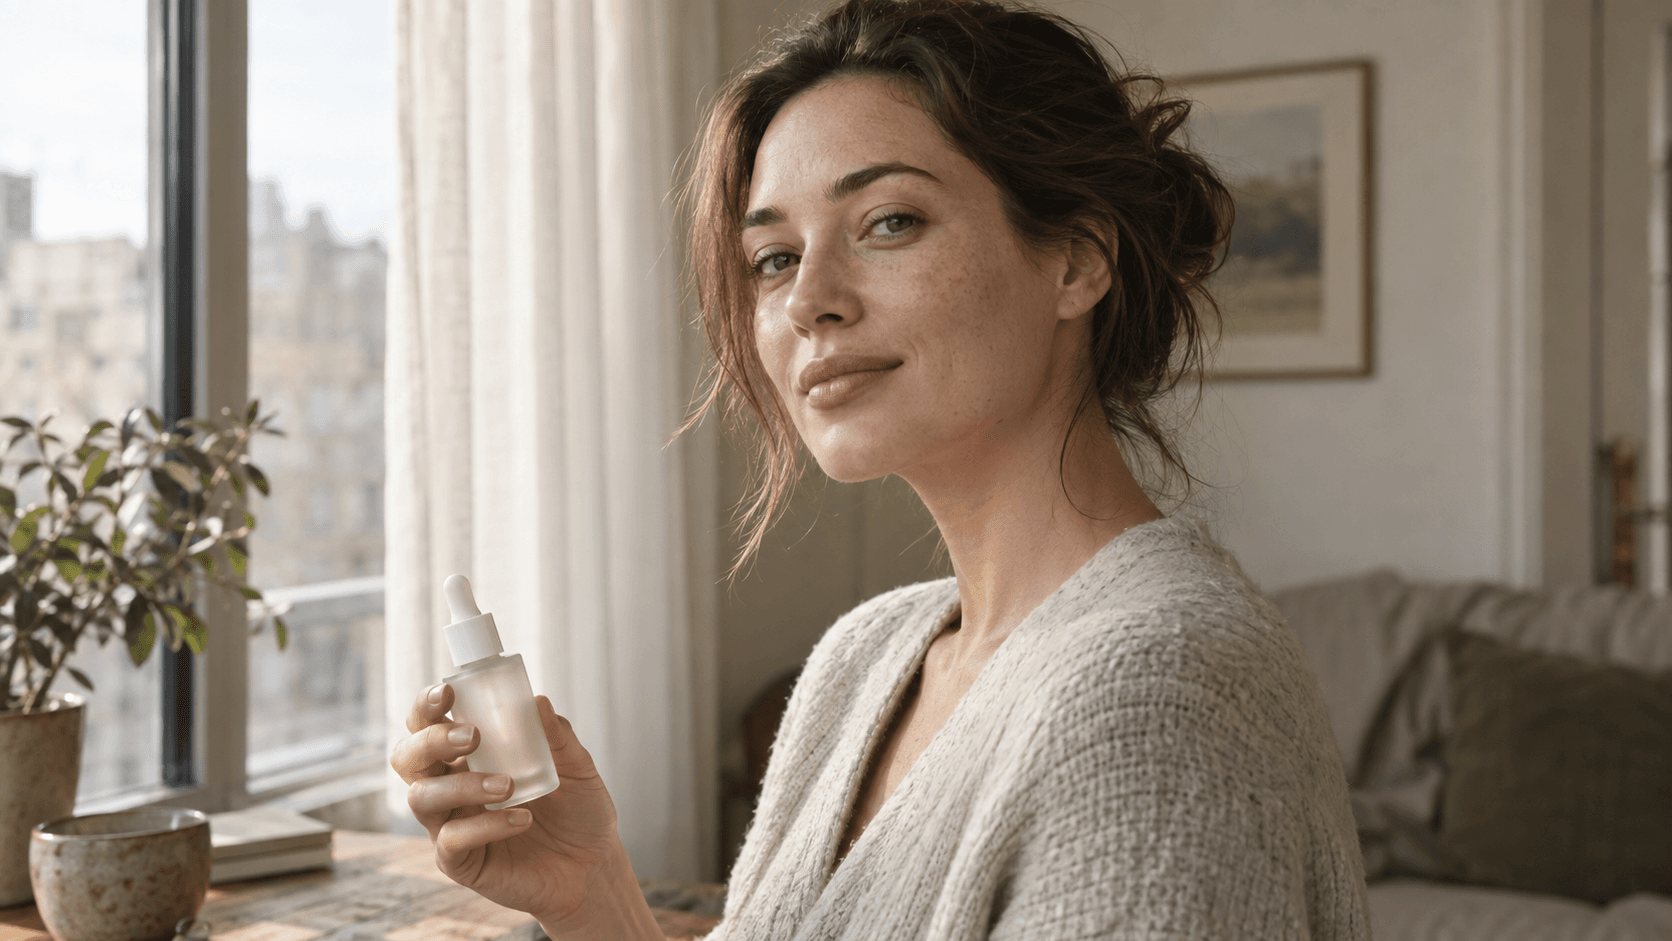
The portrait below demonstrates the target evidence. Fine texture is visible without exaggeration, and the broad window source creates a gradual transition from light to shadow. It is an illustrative generated image, not a MiniMax output.

Reference test: zoom to 100 percent and confirm that texture exists before asking a video model to preserve it.
Keep one identity anchor across the shot instead of mixing portraits with different makeup, lenses, color grades, or apparent ages. If a product is present, give it its own clean anchor rather than using a collage. MiniMax’s published product-ad workflow likewise emphasizes independent anchor photos and a precise beat-by-beat storyboard instead of a grid. A single full-frame source removes ambiguity about what the model should treat as canonical.
Match the reference to the planned shot size. A tight speaking shot needs a tight reference; a wide running shot should not be expected to reproduce pore-level detail. For multi-shot campaigns, document identity, hair, wardrobe, makeup, lighting direction, and product geometry as invariants. The H3 environment-consistency workflow extends the same discipline to locations and props.
A four-pass workflow for natural skin
Pass 1: establish a neutral baseline
Generate a short, low-complexity shot before attempting the final ad. Use one adult subject, one uncomplicated action, a locked or slow camera, broad directional light, and no beauty superlatives. A five- to eight-second baseline is easier to judge than a busy 15-second sequence. Ask for “natural unretouched skin texture, visible fine pores, soft highlight rolloff, subtle expression asymmetry, minimal makeup.”
Review the output at full resolution. Pause on the first, middle, and last seconds, then scrub between them. Look for texture that breathes or crawls, cheek highlights that detach from head movement, changing freckles, teeth that fuse, and edges around nostrils or lips that become rubbery. Do not approve from a contact sheet alone.
Pass 2: correct lighting and lens language
If highlights look varnished, simplify the lighting. Use one large soft source from the side, gentle negative fill, restrained contrast, and no hard rim. Remove “glowing,” “luminous,” “wet,” “glass skin,” or “high-fashion beauty light” unless the campaign genuinely needs them. State a plausible lens and distance, such as a 50mm medium close-up or an 85mm portrait, so composition and texture requests agree.
Pass 3: add one controlled action
Introduce speech, a head turn, or a product gesture—not all three at once. Keep the camera locked or use a slow push. If the face breaks only during hand occlusion, adjust the blocking before rewriting the whole look. For a shot sequence, the H3 multi-keyframe workflow explains how to preserve visual rules across transition points.
Pass 4: add the commercial beat
Once skin and identity remain stable, add the product reveal, copy timing, sound cue, or camera move. This order protects the most fragile evidence before production complexity rises. Save the approved baseline, the changed variable, and the result. A two-stage approach is often cheaper than rerunning the complete ad; see the H3 two-stage workflow for planning draft and final passes.
Prompt template for realistic ad skin
Write observable details, not vague praise
Use this template as a diagnostic starting point, then adapt it to the actual reference:
An adult spokesperson in a medium close-up beside a north-facing window, performing one slow product gesture and speaking one short line. Preserve the supplied identity, facial proportions, faint freckles, fine pores, individual eyebrow hairs, and subtle under-eye texture. Minimal makeup. One broad soft side light, gentle shadow rolloff, restrained contrast, natural highlight response, 50mm lens, slow camera push, realistic micro-expressions, stable skin texture across every frame. Unbranded serum bottle remains unchanged. Avoid beauty-filter smoothing, waxy sheen, wet glossy skin, hard double rim light, excessive sharpening, and changing freckles.
The positive instructions describe things a reviewer can see. The avoid list narrows obvious style drift, but it is not a repair command. If the source has no pores or the face occupies ten percent of the frame, repeating “photorealistic” will not create trustworthy detail.
Make one prompt per shot. Reusing a long master prompt across a close-up, wide shot, and product macro can create contradictions. Carry only the true invariants: identity, skin finish, wardrobe, product, light direction, and color palette. Change action, lens, framing, and camera movement shot by shot.
Review motion, audio, and commercial fit
Judge a face while it moves and speaks
A still frame cannot prove temporal consistency. Play the shot at normal speed, half speed, and without sound. At normal speed, look for overall credibility. At half speed, inspect eyes, lips, jaw, cheeks, and the boundary where fingers cross the face. Muting the clip helps reveal whether convincing audio is distracting you from visual drift.

Illustrative generated frame: a speaking or application shot should retain texture through expression and occlusion, not only on its opening frame.
The motion sample below is a real Seedance output used to demonstrate how facial performance and native audio should be reviewed together. It is not a MiniMax H3 comparison or proof that one model fixes another model’s artifacts.
Seedance motion sample for the acceptance method: watch skin, lip timing, eye focus, and highlight movement across consecutive frames.
For ad approval, inspect more than realism. Confirm that the product silhouette and label stay stable, the claim is supported, the speaker’s line matches the intended market, and the end frame leaves room for copy. Test the final crop at delivery size. A convincing 16:9 face may become too small after a 9:16 reframing.
When to regenerate versus finish in post
Regenerate structural failures
Regenerate if identity changes, facial geometry warps, freckles migrate, skin texture pulses, a hand merges with the cheek, or a product changes shape. These are temporal or structural errors. Local contrast correction cannot make them consistent, and aggressive denoising can make the plastic effect worse.
Post-production is appropriate when the underlying face is stable and the problem is mild: highlights are slightly hot, saturation is too strong, local contrast is excessive, or sharpening has emphasized pores unnaturally. Make small, reversible adjustments while watching the complete clip. Avoid pushing one paused frame until it looks perfect; the grade must hold through motion.

Illustrative final-frame target: stable identity, plausible skin, readable product, and enough environmental context for a finished ad.
A simple acceptance sheet prevents taste from moving during review. Score identity stability, skin texture, highlight behavior, eyes and mouth, hand contact, product geometry, audio sync, and delivery crop from one to five. Mark any structural score below four for regeneration. Finish only the shots that already pass identity and motion.
If local graphs, checkpoints, and repeated reruns are slowing the campaign, use the Seedance image-to-video workspace to test a clean reference and motion brief, or move the complete brief into Seedance Agent. Keep the selected source frame, prompt, output, and approval note together so the next variation starts from evidence rather than memory.
Conclusion
The practical MiniMax H3 plastic skin fix for video ads is a controlled production workflow: begin with an unretouched reference that contains real texture, use broad plausible light, give the face enough frame area, add only one motion variable at a time, and judge consecutive frames at delivery size. Regenerate identity or temporal failures; reserve post-production for mild stable grading issues. To organize references, shot rules, native-audio review, and targeted reruns in one campaign brief, start with Seedance Agent.
Ready to try it yourself?
Put the steps from this guide into practice with Seedance and turn prompts or images into polished videos in minutes.
Free credits on signup. Plans from $20/month.
Related Articles
More posts in the same locale you may want to read next.

Seedance App Preview Video Generator 2026: Create App Store and Product Launch Clips
Use Seedance to turn app screenshots, feature copy, and launch goals into App Store previews, Google Play promo videos, and product launch clips.
Read article
VEED Auto Subtitles Free: A Practical Guide to Captions You Can Publish
Use VEED auto subtitles on a free plan, correct caption timing and style, understand watermark and SRT limits, and prepare a caption-ready video with Seedance.
Read article
Firefly Video Transparent Background Tutorial: Generate, Export, and Composite Clean Overlays
Generate a transparent-background video in Adobe Firefly, understand its foreground and alpha files, test edge quality, and composite a usable overlay.
Read article