
MiniMax H3 Blender Animation to Realistic Video: A Practical Workflow

AI Overview
Can MiniMax H3 turn a Blender animation into realistic video?
Yes. Use the Blender playblast as a motion and camera reference, then describe the intended subjects, materials, lighting, environment, and sound in the generation prompt.
Should I use Ref2VA or FL2VA for a Blender playblast?
Use Ref2VA when the full playblast should guide timing and camera motion. Use FL2VA when only the opening and ending compositions must be locked.
Does the Blender animation need finished materials?
No. Clear silhouettes, depth, contacts, and readable motion matter more than polished shaders, although color-coded objects can make reference roles easier to describe.
Will the AI preserve the Blender motion exactly?
Treat the playblast as strong guidance, not a motion-capture guarantee. Review trajectory, contact, camera rhythm, subject identity, and object count before accepting the result.
Why Use Blender Before MiniMax H3?
People searching for a MiniMax H3 Blender workflow usually want control over a shot that is difficult to describe with text alone. A vehicle must follow a particular curve. A character must cross behind a foreground object. A camera must arrive at a reveal on the right beat. Blender is useful here because it converts those intentions into visible timing, screen direction, scale, and occlusion.
The 3D scene does not need to be a finished render. Think of it as a moving specification. Blocking a camera, rough subject, ground plane, and major obstacles can remove ambiguity before a paid video generation. H3 then has a different job: reinterpret the blockout with believable surfaces, light, atmosphere, secondary motion, and synchronized audio.

Illustrative finished-frame study created for this guide. It shows the visual target to inspect, not a claimed MiniMax H3 benchmark output.
Blender controls where things go; the video model proposes how the world looks and feels. This is useful for product reveals, architectural walkthroughs, vehicle shots, creature staging, and VFX plates where composition matters as much as style.
It also exposes a key limitation. “Realistic” and “exactly identical to the playblast” are competing goals when the blockout lacks enough visual information. The model may invent joints, surfaces, extra background activity, or a more cinematic camera move. The workflow below reduces that drift without pretending it can eliminate it.
Choose the Right H3 Input Route
Use Ref2VA when the playblast carries the motion
MiniMax publishes separate H3 task families. Ref2VA accepts text plus reference images, videos, and audio, then generates video and synchronized audio. This is the direct match when a Blender playblast should communicate camera timing, subject trajectories, staging, or the rhythm of an interaction.
Assign one role to each reference. The playblast is the motion reference. A clean still can define the hero vehicle, character, costume, or environment. An audio clip can define cadence when the shot depends on speech, footsteps, or machinery. Do not upload several similar assets without explaining which one controls identity and which one controls action.
If you need a deeper route comparison, use the Ref2VA versus FL2VA guide before building the generation request.
Use FL2VA when endpoints matter more than the path
FL2VA supports text and optional first and last frames. It is useful when the Blender animation is mainly a planning tool, but the final generation only needs to begin and end in specific compositions. For example, a locked first frame can show a closed hangar while the last frame shows the revealed aircraft.
Do not assume two endpoint images will preserve every turn, gesture, or camera beat between them. If the path itself is the reason you animated in Blender, use the reference-video route. If you only need controlled endpoints, the multi-keyframe workflow explains how to prepare and review visual anchors.
| What must survive? | Better starting route | Primary evidence to review |
|---|---|---|
| Full camera move and action rhythm | Ref2VA | Trajectory, timing, occlusion, contacts |
| Opening and ending composition | FL2VA | Endpoint identity and framing |
| One hero look plus a rough motion guide | Ref2VA with image and video references | Subject fidelity plus motion readability |
| A simple reveal with no exact middle path | FL2VA | Clean transition and final state |
Prepare a Blender Playblast H3 Can Read
Keep the shot simple and visually separable
Build one shot, not an entire sequence. Use one continuous camera and keep the main action readable at normal speed. Avoid several same-colored characters crossing in the same region unless that complexity is essential. A useful test is to view the playblast small and without scrubbing: if you cannot describe who moved where, the reference is not ready.
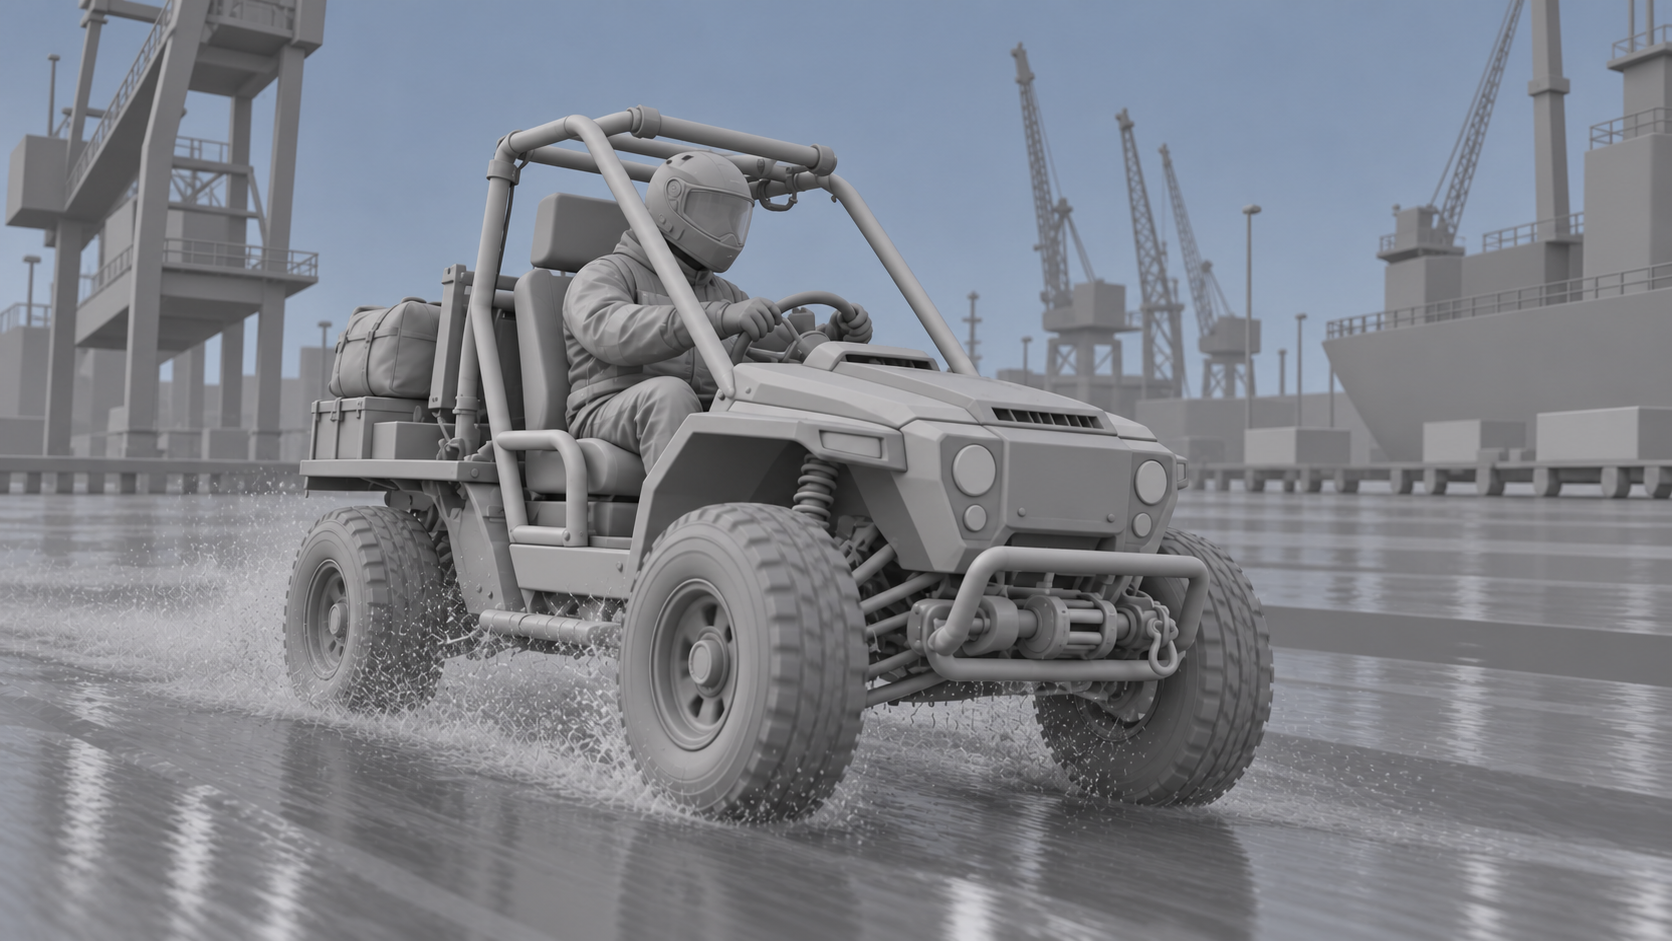
Illustrative clay-previs frame. The silhouette, camera, contact, and route remain readable before realistic materials are introduced.
Use simple geometry, but preserve the features that identify the subject. For a vehicle, keep wheel count, wheelbase, cabin silhouette, and major attachments. For a person, keep body proportions, costume volumes, and the object they handle. For architecture, preserve openings, stairs, columns, and the camera's relationship to them.
Contact shadows and a ground plane help communicate weight. A floating wheel, hand, or foot in the playblast creates uncertainty that a realism prompt cannot reliably repair. Give moving parts enough frame-to-frame displacement to read, while avoiding abrupt acceleration that looks like missing frames.
Export for recovery, not only convenience
Blender's manual recommends rendering animations as an image sequence when interruption, post-processing, or precise timing matters, then assembling the sequence afterward. That advice is useful here: an image sequence preserves recoverable frames if you need to change a color ID, replace a reference frame, or rebuild the playblast without rerendering everything.
Set the intended aspect ratio and frame rate before animation. H3 reference pipelines commonly operate around 24 fps, so record the actual playblast rate and avoid a silent timing mismatch. Export a clean H.264 review file for upload, but retain the numbered frames and .blend file as the production source.
Write the Realism Conversion Prompt
The prompt should separate what comes from the playblast from what H3 is expected to invent. Do not repeat “photorealistic” in every sentence. Name the subject, preserved action, camera, final materials, lighting, environment, secondary motion, sound, and forbidden changes.
Copy-ready prompt template
Use this template as a production brief:
Use Video 1 as the motion and camera reference. Preserve the exact subject path, camera height, turn timing, foreground occlusion, and final stopping position. Replace the gray blockout with [subject identity and construction]. The environment is [location], with [time, weather, and practical light]. Materials must show [three concrete textures]. Add only natural secondary motion: [cloth, dust, water, hair, foliage]. Generate synchronized [ambience and key sound events]. Keep [object count, geometry, costume, screen direction, and shot duration] unchanged. One continuous shot; no cuts, no added text, no logos, no extra subjects.
For the harbor example, the visual anchors are not “cool vehicle” and “cinematic rain.” They are a mustard-yellow roll cage, graphite panels, two round headlights, a black-suited rider, and a red equipment bag. Concrete anchors make it possible to reject a visually attractive result that has become a different vehicle.

Illustrative continuity frame: inspect the roll cage, rider, red bag, wheel layout, lighting direction, and route across a new composition.
If the prompt keeps producing a different environment, do not add ten more adjectives. Supply one stronger environment still or simplify the playblast. The environment-consistency guide covers the same problem across multiple compositions.
Review Motion and Realism Separately
A polished frame can hide a failed conversion. Review the result in passes so appearance does not distract from motion. First watch the camera and trajectory with the sound muted. Then watch object contacts and occlusion. Next inspect identity and materials. Finally, review sound against visible events.
Use a two-column acceptance record
| Preserve from Blender | Improve through generation |
|---|---|
| Camera start, path, and endpoint | Realistic exposure and lens response |
| Subject count and screen direction | Materials, surface wear, reflections |
| Contact timing and major poses | Cloth, rain, dust, hair, foliage |
| Foreground and background occlusion | Ambience, foley, dialogue |
| Shot duration and edit handle | Fine texture and atmosphere |
Mark each item pass, usable with repair, or fail. A result fails even if it looks impressive when the rover takes the wrong turn or the camera loses the planned reveal. Conversely, a slightly imperfect texture may be usable if the motion is correct and a later enhancement pass can improve detail.

Illustrative environment check: the vehicle remains recognizable at distance while the quay, ship, cranes, rain, and warm harbor lights expand the scene.
Do not try to solve every failure by regenerating the whole shot. If only one action beat breaks, isolate the timing or reference problem first. The motion-continuity repair guide provides a separate evaluation method for local H3 workflows.
Turn the Approved Test into a Production Workflow
Keep the Blender source, playblast, prompt, references, output, and review notes together. Record which input controlled motion, which controlled appearance, the actual frame rate, and the exact acceptance result. That package makes a rerun reproducible and prevents a later editor from treating the generated clip as an untraceable final.
For a local setup, the MiniMax H3 installation guide explains checkpoint selection and first-render validation. Generate a lower-cost or lower-resolution draft first, then upscale only after the motion, camera, and identity are worth preserving. Changing resolution cannot rescue a wrong path or missing contact.
When several Blender shots share the same cast and environment, coordination becomes the larger problem. Seedance Agent can hold the brief, reference roles, shot plan, approvals, and targeted reruns in one hosted project. Use it when the team needs to compare models or manage a sequence rather than maintain a separate local graph for every shot.
The practical handoff is simple: approve the Blender motion, approve one realistic look, generate the smallest useful clip, review it against the two-column record, and only then extend the sequence. This keeps artistic iteration visible and prevents “more realism” from silently replacing the directed motion.
Conclusion
A reliable MiniMax H3 Blender animation to realistic video workflow treats the playblast as a motion specification, not a disposable draft. Choose Ref2VA when the moving reference carries the shot, use FL2VA when endpoints are enough, keep Blender silhouettes and contacts readable, and tell H3 exactly what to preserve versus invent. Review motion before surface polish, keep a reproducible acceptance record, and upscale only an approved shot. When references, shots, approvals, and partial reruns become harder to manage than the generation itself, continue the project with Seedance Agent.
Ready to try it yourself?
Put the steps from this guide into practice with Seedance and turn prompts or images into polished videos in minutes.
Free credits on signup. Plans from $20/month.
Related Articles
More posts in the same locale you may want to read next.

Seedance App Preview Video Generator 2026: Create App Store and Product Launch Clips
Use Seedance to turn app screenshots, feature copy, and launch goals into App Store previews, Google Play promo videos, and product launch clips.
Read article
Dropshot AI MCP Video Generation: Setup, Prompts, and a Safer Workflow
Connect Dropshot AI MCP, build a reviewable video brief, control model settings and costs, and compare the workflow with Seedance Agent.
Read article
Seedance 2.5 1080p Not Available? Diagnose the Missing Resolution and Deliver Full HD
Find out why Seedance 2.5 1080p is missing, verify actual resolution, choose a native Full HD route or upscale 720p, and export correctly.
Read article