
Wan 2.2 AI Video Upscaler Detailer Workflow: ComfyUI Guide
AI Overview
What is a Wan 2.2 AI video upscaler detailer workflow?
It is a ComfyUI video-to-video pipeline that enlarges a clip and runs a low-denoise Wan 2.2 pass to rebuild texture, edges, and faces while preserving the original motion.
Which Wan 2.2 upscaling method should I use?
Use a Wan 2.2 5B latent or utility workflow when you want generative detail. Use a tiled or conservative pixel-space pass when identity, text, or product geometry must remain nearly unchanged.
What denoise strength works best for Wan 2.2 upscaling?
Start around 0.20–0.30 for faithful enhancement. Raise it only when the source is genuinely soft, because stronger denoise can invent texture, alter faces, and create frame-to-frame flicker.
Can Wan 2.2 upscale video to 1080p or 4K?
Yes. A stable route is source cleanup, then 1080p, then 4K if needed. Test a short section first and keep target width and height divisible by 64.
What Is the Wan 2.2 AI Video Upscaler Detailer Workflow?
The workflow separates two jobs that are often confused. Upscaling increases pixel dimensions. Detailing asks a generative model to reinterpret missing information. A traditional resize may produce a larger but still soft image; an aggressive detailer may create sharp hair or skin while changing the person. The useful middle ground is a low-noise second pass constrained by the original video.
The core graph is straightforward:
Load video → decode frames → choose target size → latent or pixel upscale → low-noise Wan pass → optional face detailer → rebuild video → restore audio
When this workflow is the right choice
Use it for 480p or 720p AI clips with good motion but weak micro-detail, compressed backgrounds, soft fabrics, or faces that collapse in wider shots. It is less suitable when the source has broken anatomy, severe scene changes, incorrect lip movement, or baked-in subtitles. Fix those defects first; upscaling makes visible errors larger.
Before a full render, test three to five representative seconds containing motion, fine texture, and the darkest part of the scene.
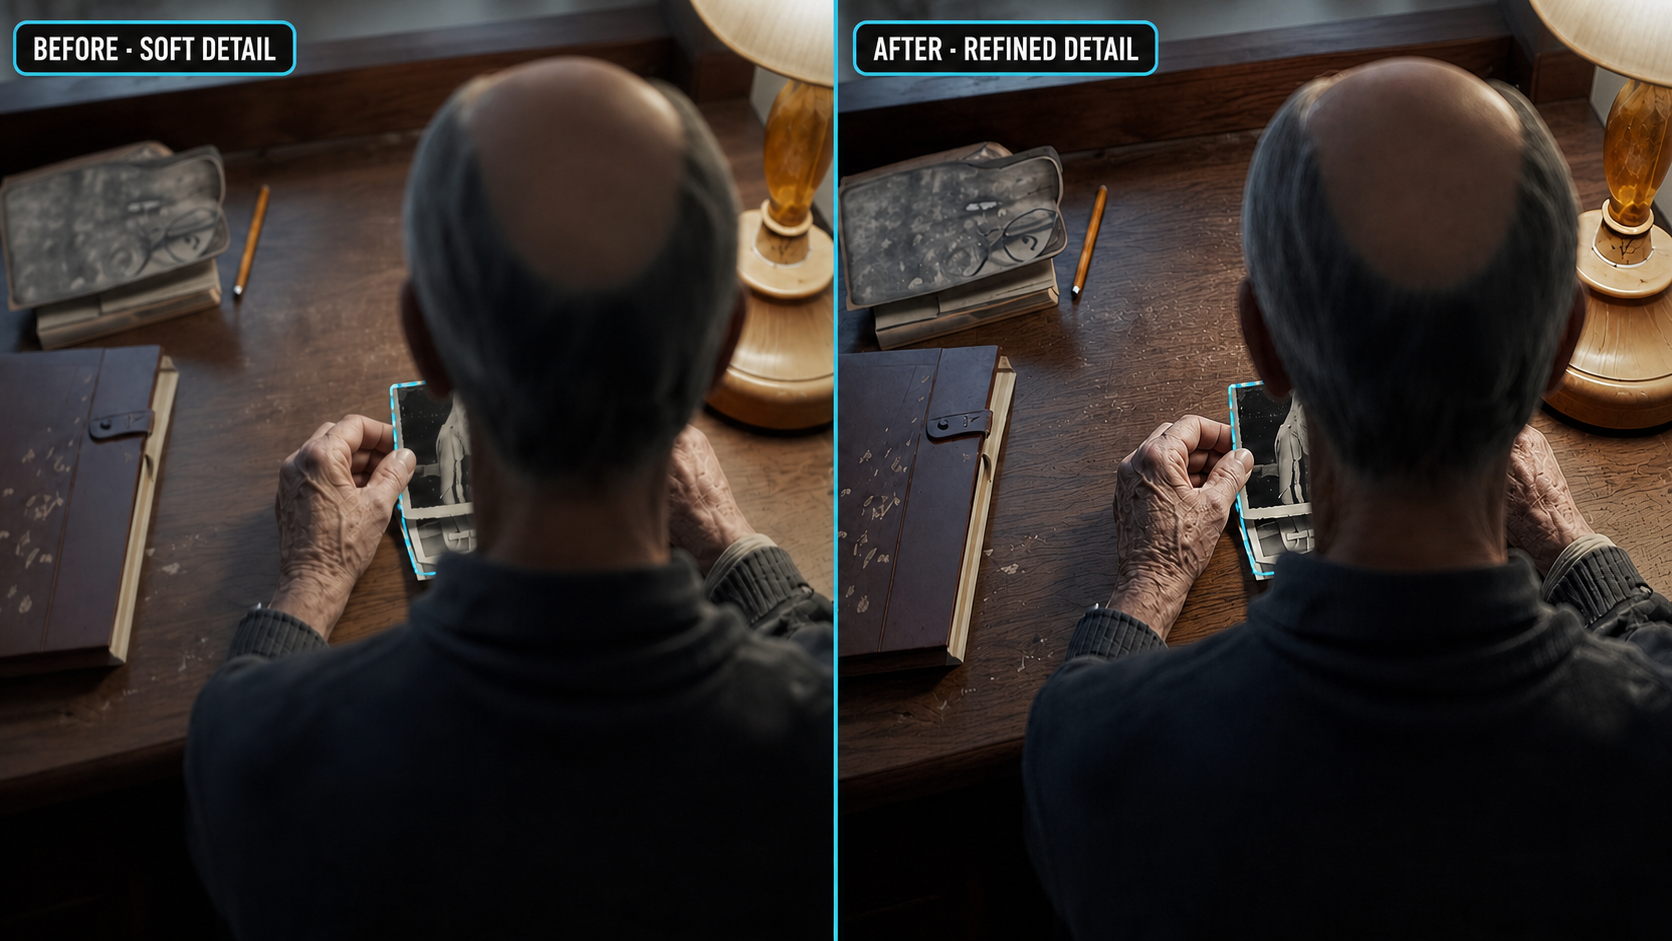
A useful review frame shows the detected region plus matched before-and-after crops. Judge structure and identity before judging sharpness.
What You Need: Models, Custom Nodes and Workflow Files
Update ComfyUI before importing the graph. Old core nodes or mismatched custom-node versions are the most common reason a shared workflow opens with red boxes. Restart after installing nodes so every model loader and video input is registered.
Required model stack
| Component | Practical starting choice | Purpose |
|---|---|---|
| Wan model | wan2.2_ti2v_5B_fp16.safetensors for the lighter utility route |
Adds generative detail with lower memory pressure |
| Detailer model | Wan 2.2 low-noise 14B variant when VRAM allows | Focused high-quality refinement |
| VAE | Wan-compatible VAE | Decodes and re-encodes frames |
| Text encoder | UMT5-compatible encoder | Carries the positive and negative guidance |
| Segmentation | SAM2 small model | Tracks the face or selected subject region |
For a face branch, use a Wan video wrapper, video load/combine nodes, segmentation, and basic utilities. Keep the first version minimal; extra routing and style LoRAs make debugging harder.
Place each file in the directory expected by its loader, then verify the exact filename inside the graph. Do not assume a model with “high noise” and one with “low noise” are interchangeable: the low-noise stage is the polishing pass. If you regularly run long local workflows on limited hardware, the low-VRAM long-video guide explains the same practical ideas—short tests, tiled decoding, block movement, and segment handoffs.
How to Run the Wan 2.2 Video Upscale Workflow Step by Step
- Load the approved source. Record its FPS, dimensions, duration, and audio state. Avoid variable-frame-rate inputs.
- Trim a test window. Start with 49–81 frames and include movement plus a face when relevant.
- Set the target dimensions. Choose a 1.5× or 2× pass and round width and height to values divisible by 64. Do not jump from a very small source directly to 4K.
- Choose the upscale path. Latent upscale rebuilds detail; tiled processing is safer for long clips, product shapes, signs, and limited VRAM.
- Run the low-noise sampler. Begin with conservative denoise and a neutral enhancement prompt such as “natural fine detail, stable texture, consistent face.” Avoid adding new story content.
- Enable the face branch only if needed. Detect, segment, crop, refine, feather the mask, and composite the crop back into the same frame.
- Rebuild and review. Restore the original FPS and audio, then watch at normal speed and frame by frame.
Before you queue the full clip
Compare the same frame numbers, not random thumbnails. Check eyes, fingers, logos, fabric direction, background texture, and color drift. If the short test fails, do not queue the full clip.
For inputs with heavy stylization, transitions, or effect layers, finish those creative decisions in your video-effects workflow before the upscale pass. The detailer should polish an approved edit rather than become another unpredictable generation stage.
Best Wan 2.2 Upscale Settings for Detail, Fidelity and VRAM
There is no universal best preset. The right value depends on how much valid information remains in the source and how much change the shot can tolerate.
| Goal | Denoise starting range | Scale | Recommended approach |
|---|---|---|---|
| Preserve identity and composition | 0.15–0.24 | 1.5× | Conservative pass; inspect motion first |
| Add natural texture | 0.22–0.32 | 1.5×–2× | Low-noise Wan refinement |
| Repair very soft AI output | 0.32–0.45 | Up to 2× | Accept more reinterpretation and test masks |
| Work with 8–12GB VRAM | 0.18–0.28 | 1.5× | Short batches, tiled VAE, smaller model |
| Deliver 4K | Conservative | Two stages | Clean source → 1080p → 4K |
How to read the result
More sharpness is not automatically better. Reduce denoise if hair, lettering, or jewelry changes between frames. Reduce the scale or tile size if memory spikes. If the result is stable but flat, add a little denoise before increasing steps.
Resolution, frame count, model precision, VAE mode, and concurrent nodes all affect VRAM. Queue one graph at a time and clear cached models between stages when supported. For a delivery checklist, see the Seedance 4K video tutorial.
How to Use Wan 2.2 Face Detailer Without Flicker
A face detailer gives one important region more pixels and focused sampling: detect, segment, expand the crop, refine, feather the mask, and composite it back.
Keep the detailer subordinate to the source
Start with one face and low denoise. Include the hairline, jaw, and some context; a tight crop can look pasted on. Keep the face index fixed in multi-person shots and watch for mask jumps.
Watch the woman’s face through head movement and rain. A successful pass improves readability without changing expression, age, or identity.
For changing eyes, plastic skin, or a mask halo, reduce denoise, increase feathering, and simplify the prompt. During fast turns or occlusion, avoid forcing a full-strength replacement.
A turning subject is a tougher temporal test than a static close-up: review the transition into profile and back again.
Troubleshooting and Choosing the Right Upscaler
Common failures and fixes
| Problem | Likely cause | First fix |
|---|---|---|
| CUDA out of memory | Too many frames, large latent, full-precision model | Shorten the batch, tile VAE, or use the 5B route |
| Missing red nodes | Custom nodes are absent or outdated | Install the named pack, update, restart, reopen |
| Black or empty output | VAE, frame range, or video-combine mismatch | Test decode and save before the detailer branch |
| Texture crawling | Denoise is too high | Lower denoise and remove style-heavy prompt terms |
| Face changes identity | Crop lacks context or sampler is too creative | Add padding, lower denoise, lock the face index |
| Color shifts | Generative pass is rewriting the grade | Use a neutral prompt and match color after upscale |
Choose generative Wan upscaling when the source genuinely lacks detail and some creative reconstruction is acceptable. Choose a conservative or pixel-space upscaler when text, products, architecture, or documentary identity must stay exact. A hybrid workflow often works best: fix obvious AI artifacts, perform a restrained Wan pass to 1080p, then use a conservative final resize.
Compare motion stability, error rate, render time, and shippable output—not one attractive frame. For a broader production comparison, read Wan 3.0 vs Seedance 2.5.
Conclusion
The most reliable Wan 2.2 AI video upscaler detailer workflow keeps changes controlled: test a short segment, upscale by 1.5×–2×, use low denoise, and apply face detailing only where needed. Review motion, identity, and texture at normal speed before processing the full clip, then create your next AI video with Seedance.
Ready to try it yourself?
Put the steps from this guide into practice with Seedance and turn prompts or images into polished videos in minutes.
Free credits on signup. Plans from $28/month.
Related Articles
More posts in the same locale you may want to read next.

Seedance App Preview Video Generator 2026: Create App Store and Product Launch Clips
Use Seedance to turn app screenshots, feature copy, and launch goals into App Store previews, Google Play promo videos, and product launch clips.
Read article
Kling 4.0 vs Seedance 2.5: Full Comparison
Kling 4.0 vs Seedance 2.5 compared by spec: 30-second clips, keyframes vs 50 references, audio, 4K and 10-bit color, editing, and which model fits which job.
Read article
Kling 4.0 Keyframes & Omni Reference Guide
Learn how Kling 4.0 uses up to 10 keyframes and 15 Omni Reference assets in one 30-second video, with 3 worked plans, common mistakes, and Seedance 2.5 tips.
Read article