
MiniMax H3 First and Last Frame: How to Control Both Ends of Your AI Video
AI Overview
What is MiniMax H3 first and last frame?
MiniMax H3 FLF2V takes a start image and an end image, then generates the visual motion and synchronized stereo audio between them. You define both endpoints while the prompt directs the journey.
How is first-and-last-frame different from image-to-video?
Image-to-video locks only the opening frame. First-and-last-frame locks both ends, so the model must arrive at a specific final composition instead of inventing one.
What image formats and resolutions does MiniMax H3 FLF2V accept?
Hosted H3 tools accept common web images including JPEG and PNG, and the output ratio follows the first image. Match both frames to the same dimensions and ratio before uploading.
Can I use MiniMax H3 first-and-last-frame without a local GPU?
Yes. Cloud-hosted H3 endpoints handle generation remotely, while local users can run the open-weight workflow in ComfyUI when they have suitable hardware.
What MiniMax H3 First and Last Frame Actually Does
MiniMax H3 first-and-last-frame video, or FLF2V, treats two still images as hard visual anchors. The first image fixes frame zero. The last image fixes the destination. Between them, H3 plans motion, camera behavior, lighting changes, object transformations, and native stereo audio. A closed flower can open into a bloom, a noon street can move into blue hour, or a sealed product box can finish fully open.
Ordinary image-to-video has only the first anchor, so the ending can drift in pose, framing, color, or product geometry. FLF2V narrows that uncertainty. It does not simply crossfade: the model synthesizes a plausible route between two compositions. This makes endpoint control much stronger, although the middle still depends on how compatible the images and prompt are.
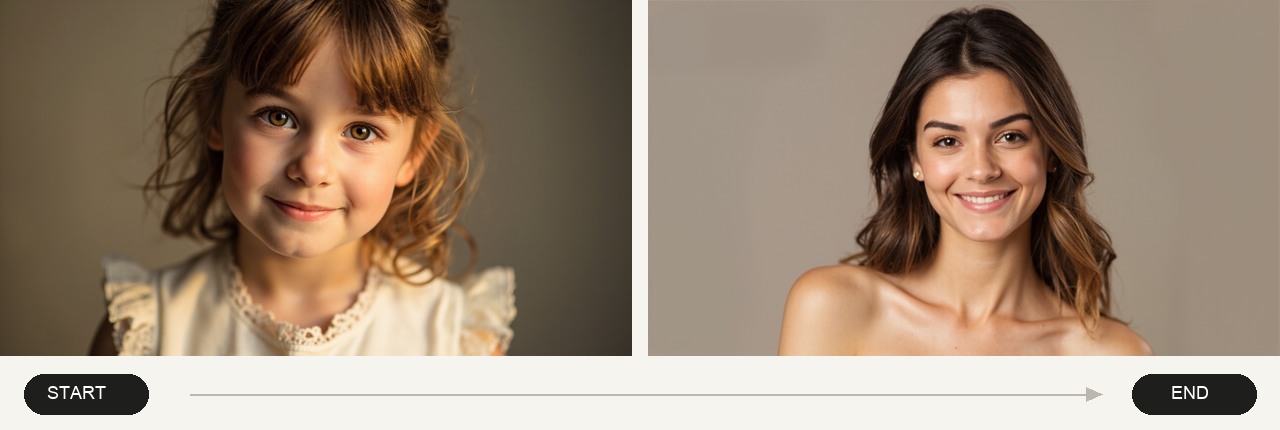
A real first-and-last-frame pair from the official MiniMax API documentation. Matching 16:9 frames give the model a clean path from the opening portrait to the final portrait.
Use Cases — When Two Anchored Frames Beat One
Two anchors are most useful when the last shot matters as much as the first:
| Use case | First frame | Last frame | What H3 plans |
|---|---|---|---|
| Product reveal | Closed package | Product fully displayed | Opening action, handoff, highlights, sound |
| Time transition | Sunrise street | Night skyline | Light, traffic, sky, and ambience changes |
| Character action | Standing pose | Controlled landing | Body path, cloth motion, impact, camera follow |
| Storyboard bridge | Approved shot A | Approved shot B | A connective shot between two panels |
| Before/after ad | Original room | Finished makeover | Material and layout transformation |
The official H3 example below is a finished generated clip, not a concept illustration. Notice how the fixed binocular mask and repeated red accents give the model strong continuity cues while the camera scans between planned moments.
How to Use FLF2V — Step-by-Step via the MiniMax API and Seedance
- Prepare two compatible images. Crop both to the same aspect ratio and dimensions. Keep the subject scale, camera axis, and major geometry close enough for a believable transition.
- Describe motion, not appearance. The images already define the subject and look. Write the action, timing, camera movement, and audio cues that should connect them.
- Submit the two endpoints. A hosted H3 request uses the opening image plus an end-image field; in a browser workflow, follow the Seedance first-and-last-frame guide and upload the two frames in order.
- Generate a short test. Start with the shortest useful duration. Review the middle for identity drift, unwanted dissolves, object popping, and audio that contradicts the action.
- Change one variable at a time. If the route is wrong, simplify the motion prompt before replacing good endpoint images.
If you only need to animate one approved product or character image and do not care about the exact ending, the simpler Seedance Image to Video workspace is usually faster.
Running First-and-Last-Frame in ComfyUI
Update ComfyUI before building the graph; this workflow assumes version 0.30.0 or newer. Load the H3 FL2VA diffusion model, the compatible Qwen3-VL text encoder and VAE, then add the native MiniMaxH3ImageToVideo conditioning node. Connect the two decoded image inputs to first_frame and last_frame, set the target width and height, and choose a valid length on H3's 17k+5 frame grid. A common five-second test is 124 frames at 24fps.
Keep both input images at the same ratio as the latent. H3's guidance-distilled sampler uses guidance 1; raising conventional CFG can reduce stability instead of improving it. The complete MiniMax H3 ComfyUI setup covers the base files and graph order.
For faster iteration, add a compatible Turbo adapter and test four-step inference before increasing steps. The MiniMax H3 Turbo LoRA guide shows the loader placement and recommended strengths. Turbo helps preview the transition, but a final quality pass may still benefit from the base workflow.
Writing Prompts That Work with Two Fixed Frames
The endpoint images already answer what is visible. A useful FLF2V prompt explains how the shot travels between them: subject action, speed, camera path, environmental change, and sound. Avoid repeating every visual detail because that can fight the supplied frames. For broader syntax and camera vocabulary, use the MiniMax H3 prompting guide.
Product reveal: The camera makes a slow 30-degree orbit as the lid lifts in one continuous motion. A soft highlight travels across the metal surface; no cuts or dissolves. Precise hinge movement, quiet studio ambience, subtle latch click.
Day-to-night transition: Hold the camera position. Time advances smoothly from warm late afternoon into blue hour; practical lights switch on one by one, traffic continues naturally, and distant city ambience grows slightly louder.
Character landing: The character drops through frame, rotates once, and lands in the final crouched pose. Camera tilts down and eases to a stop on impact. Coat and hair follow the motion with realistic inertia; one clean landing sound.
These prompts specify direction and rhythm without redescribing the fixed wardrobe, location, or product. Use explicit continuity language—one continuous shot, no cut, preserve the logo—only where failure would ruin the transition.
Limits, Known Issues, and How to Work Around Them
| Problem | Why it happens | Practical fix |
|---|---|---|
| Endpoint crop or jump | Images use different ratios or subject scales | Match canvas size; align horizon, eyeline, and subject center before upload |
| Morphing in the middle | The two frames imply an impossible geometry change | Reduce the visual distance or add an intermediate generation step |
| Weak arrival at the end | Too many actions compete for a short duration | Keep one main action and reserve the final second for settling |
| Unwanted crossfade | Prompt describes a transformation but not physical motion | Name the mechanism: opens, rotates, unfolds, walks, or camera pans |
| Audio misses the beat | Audio is generated with the motion, not frame-locked | Request one simple sound cue and replace critical audio in post |
| Duration mismatch | Local H3 follows the 17k+5 frame grid |
Use valid counts such as 124, 209, or 294 frames at 24fps |
The largest failure source is asking two images to describe different worlds. A centered studio packshot cannot naturally become a wide outdoor action scene in one short clip without invented geometry. FLF2V is strongest when the endpoints differ in state, pose, light, or camera position—but still share a coherent subject and space.
Conclusion
MiniMax H3 first-and-last-frame mode is the right choice when a video must begin and end on approved visuals: match the two frames, describe only the movement between them, test a short transition, and simplify anything that morphs or jumps. Use cloud generation when you want speed, or ComfyUI when you need local control; when you are ready to turn two keyframes into a finished campaign clip without configuring a local GPU, create your next video with Seedance →.
Ready to try it yourself?
Put the steps from this guide into practice with Seedance and turn prompts or images into polished videos in minutes.
Free credits on signup. Plans from $28/month.
Related Articles
More posts in the same locale you may want to read next.

Seedance App Preview Video Generator 2026: Create App Store and Product Launch Clips
Use Seedance to turn app screenshots, feature copy, and launch goals into App Store previews, Google Play promo videos, and product launch clips.
Read article
Gemini AI Video Prompt Examples: Copy-Ready Veo Scenes and a Better Prompt Formula
Copy Gemini AI video prompt examples for cinematic motion, product ads, dialogue, and vertical clips, then adapt them with a practical Veo prompt formula.
Read article
How to Keep Product Shape Consistent in AI Video Ads
Lock product geometry, packaging, labels, references, camera angles, and approval checks so AI video ads preserve the real SKU across every shot.
Read article