
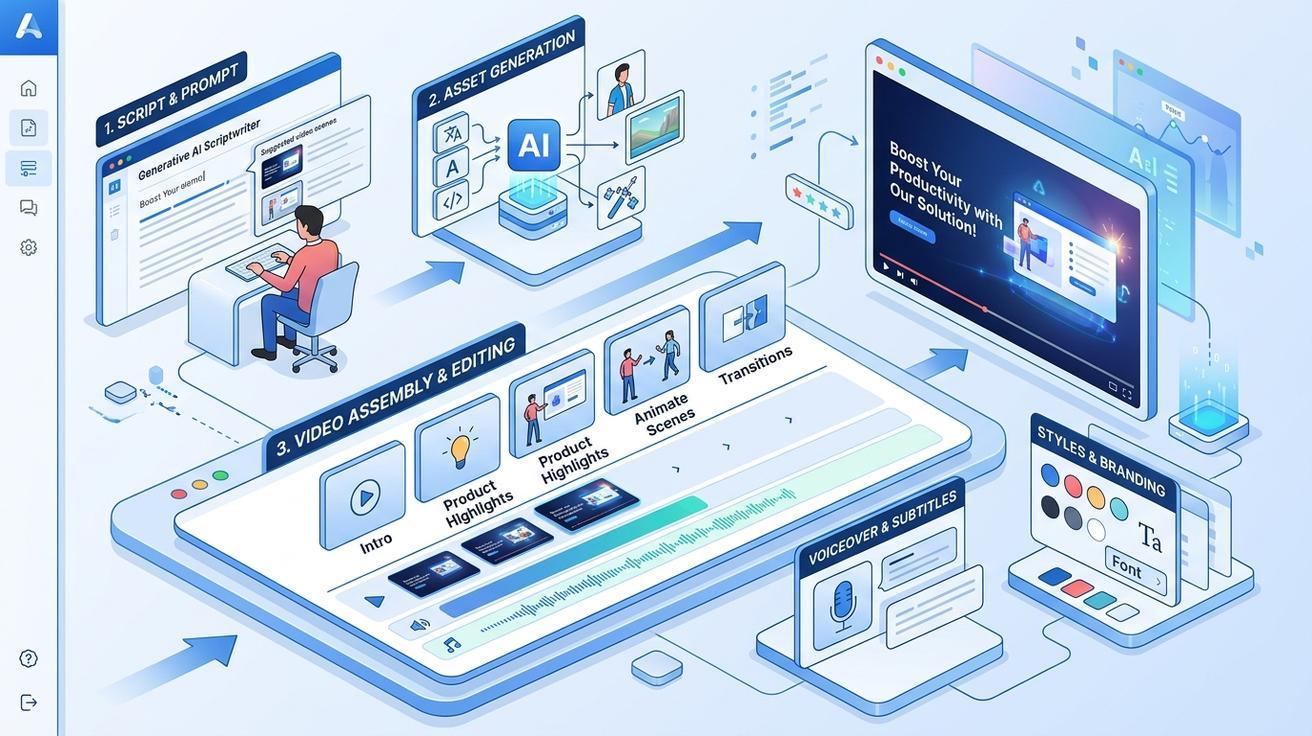
If you've ever tried to explain your product in under 90 seconds, you know how hard it is. Explainer videos are the clearest way to show what your SaaS, app, or service does — but traditional production takes weeks and costs thousands. Today, an AI explainer video generator like Seedance can take you from a text prompt to a polished video clip in minutes. This guide walks through the full workflow, with prompts, visual tips, and practical advice for startups, marketers, and product teams.
Whether you're building a landing page hero, an onboarding walkthrough, an app store preview, or a startup pitch demo, this guide covers everything you need to produce professional explainer videos with AI in 2026.
What Are Explainer Videos (and Why Every Business Needs One)
An explainer video is a short video — typically 60 to 90 seconds — that communicates a single idea: what your product does, who it's for, and why someone should care. They appear on landing pages, app store listings, onboarding flows, sales decks, and social media ads.
Explainer videos work because they compress complex value propositions into a format humans can absorb in seconds. A wall of text describing your product's features takes minutes to read and is quickly forgotten. A well-structured 60-second video showing the problem, the solution, and the outcome is retained and shared.
Here's why businesses prioritize them:
Conversion lift: Landing pages with explainer videos convert significantly better than text-only pages. Seeing the product in motion removes uncertainty about what it actually does.
Faster onboarding: New users who watch a product walkthrough during onboarding activate faster and complete setup steps at higher rates. They understand the interface before they even click around.
App store performance: Both App Store and Google Play support preview videos. A 15–30 second clip showing your UI in motion consistently outperforms screenshot-only listings, especially for complex tools or productivity apps.
Investor communication: A 60-second animated explainer in a pitch deck communicates your value proposition faster and more memorably than any slide. Investors see hundreds of pitches — a demo that shows the product working is a differentiator.
Social media ads: Short-form explainer clips repurposed as vertical 9:16 video work across Instagram Reels, TikTok, and YouTube Shorts. One production session can generate every ad format you need.
The problem has always been cost and speed. Professional animation studios charge $5,000–$20,000 per finished minute. Stock footage looks generic. Hiring a freelance motion designer takes weeks. AI video generation has fundamentally changed this calculus.
How Seedance AI Handles Explainer Video Creation
Seedance is an AI video generation platform that supports text-to-video, image-to-video, and multi-model generation in a single workspace. For explainer video production, three capabilities matter most.
Text-to-Video Generation
Describe a scene in plain language and Seedance renders it as a video clip. You control camera movement, pacing, lighting, mood, and visual style entirely through your prompt. For explainer videos, this means you can generate abstract concept visualizations, animated process flows, or dynamic backgrounds without any source footage.
Text-to-video works especially well for the "problem" scenes at the start of your explainer — showing a frustrated user, a cluttered workflow, or a missed opportunity before your product enters the picture.
Image-to-Video Animation
Upload a product screenshot, UI mockup, brand asset, illustration, or character design and animate it. This is the fastest path to a product demo explainer because your actual interface comes to life. You're not generating a fake approximation of your UI — you're animating the real thing.
Image-to-video in Seedance is particularly effective for:
- Animating dashboard screenshots with simulated user interactions
- Bringing static product mockups into motion for landing page heroes
- Creating app store preview clips from existing UI designs
- Animating your brand character or mascot from an illustration
Consistent Character Across Multiple Clips
Using a reference image, Seedance can maintain the same character appearance across multiple generated scenes. This is critical for explainer videos where you want a single spokesperson, mascot, or avatar to appear throughout the video in different settings and poses.
Without character consistency, a multi-scene explainer looks like it was stitched together from unrelated clips. With reference image guidance, the same character walks through your product story from scene one to the final CTA.
Multi-Model Generation
Seedance gives you access to multiple AI video models — including Seedance 2.0, Veo 3, Sora 2, and Kling — from the same interface. You can generate 2–3 versions of each scene using different models and pick the best take. This is the AI equivalent of shooting multiple takes on a film set, and it dramatically improves the consistency and quality of your final output.
Step-by-Step: Creating a SaaS Product Explainer with Seedance
Here's a complete production workflow for a 60–90 second SaaS product explainer video using Seedance.
Step 1: Plan Your Script in 4–5 Scenes
Keep it tight. A 90-second video needs roughly 4–5 scenes at 15–20 seconds each. Write the narration script first, then map each line to a scene description.
Scene structure template:
- Problem (10–15 sec): Show the pain point your product solves. A person struggling with a messy spreadsheet, a stack of unread emails, a slow manual process.
- Solution intro (10–15 sec): Introduce your product and what it does in one sentence. Show the interface appearing for the first time.
- Feature walkthrough (30–40 sec): Show 2–3 key features working. Animate the actual UI, not diagrams.
- Result (10–15 sec): Show the outcome. A happy user, a clean dashboard, a completed task.
- Call to action (5–10 sec): One clear instruction. "Start your free trial at [product.com]."
Write the voiceover narration for each scene before generating any video. This ensures your visual prompts match the pacing and content of the audio.
Step 2: Upload Your Visual Assets
In Seedance, upload the source assets for your image-to-video scenes:
- Product UI screenshots at full resolution (retina if possible)
- Brand character or avatar illustration (if using a spokesperson)
- Logo and brand color palette reference image
- Any product mockups or workflow diagrams you want animated
These files become the foundation for your image-to-video generations.
Step 3: Write Scene Prompts and Generate
For each scene, write a specific prompt in Seedance, select your preferred model (Seedance 2.0 for photorealistic motion, Kling for stylized animation, Veo 3 for natural camera movement), and generate 2–3 versions.
Evaluate each version for:
- Does the motion match the intended action?
- Is the character or UI legible and recognizable?
- Does the camera movement feel intentional, not random?
- Is the overall visual style consistent with the previous scene?
Step 4: Check Visual Consistency
Watch all your selected clips back-to-back before exporting. Look for:
- Character consistency: Does your spokesperson look the same across all scenes? Same hair, same clothing, same face structure?
- Color consistency: Are your brand colors showing up correctly? Avoid clips where the interface suddenly looks different.
- Lighting consistency: A mix of bright outdoor lighting and dark studio lighting across scenes breaks visual cohesion.
- Motion style: Smooth cinematic camera movement in some clips and shaky handheld footage in others will make the video feel unpolished.
If a clip doesn't match, regenerate it with additional constraint prompts specifying the visual style of the other clips.
Step 5: Export and Assemble
Export each approved clip from Seedance at the highest available resolution. Assemble in a video editor — CapCut, DaVinci Resolve, Adobe Premiere, or even iMovie work fine. Add:
- Voiceover: Record narration separately for best quality; AI voiceover tools like ElevenLabs work well for fast iteration.
- Background music: Use royalty-free tracks that match the emotional tone (upbeat and energetic for a productivity tool; calm and professional for a B2B enterprise product).
- Captions: Always add captions. A large percentage of social video is watched without sound.
- Lower thirds and text overlays: Add feature labels and key statistics as text overlays in your editor, not in the AI prompt — AI-generated text in video is unreliable.
Step 6: Optimize for Each Platform
Different platforms have different requirements:
- Landing page hero: 16:9, 720p or 1080p, autoplay muted, 60–90 seconds max, no hard cuts in first 3 seconds (autoplay triggers before the user interacts)
- App store preview (App Store): Portrait 9:16 or landscape 16:9, 15–30 seconds, must show the actual app interface
- YouTube pre-roll: 16:9, hook in first 5 seconds (before skip button appears), 15–60 seconds recommended
- Instagram Reels / TikTok: 9:16, first frame must be visually arresting, 15–30 seconds for maximum completion rate
- Pitch deck embed: 16:9, under 90 seconds, no autoplay (presenter controls it manually)
Prompt Templates for Explainer Video Styles
Copy and adapt these prompts directly in Seedance. Each is designed for a specific scene type common in explainer videos.
1. Product Demo — SaaS Dashboard
A user opens a clean SaaS analytics dashboard on a MacBook. The camera slowly zooms in on colorful real-time charts updating with new data. Soft blue ambient lighting, modern home office background, professional and polished feel. 4–5 seconds, smooth motion, no abrupt cuts.
2. Feature Walkthrough — Mobile App Interface
Close-up of a smartphone screen showing a minimalist task management app. A finger taps to create a new task, a smooth slide-in animation populates the fields, a green checkmark confirms completion. White and light gray UI, clean sans-serif typography, 5 seconds.
3. How-It-Works — Flat Animation Style
Flat design animated explainer: a small business owner looking overwhelmed at a desk covered in paper invoices, then clicking one button on a laptop screen, and the invoices digitally organize themselves into a clean dashboard. Warm pastel color palette, friendly and approachable illustration style, smooth 2D animation transitions. 6 seconds.
4. Consistent Character Spokesperson
[Attach reference image of your character] A friendly female product manager in a blue blazer stands in front of a frosted-glass office background. She gestures with her right hand toward a floating product UI mockup beside her. Natural conversational body language, soft studio lighting, cinematic depth of field. 5 seconds. Maintain exact face, hair, and clothing appearance from the reference image.
5. Call-to-Action Scene
A bright, clean product landing page fills the screen. A large rounded "Start Free Trial" button pulses gently with a subtle glow. The camera slowly zooms in on the button. Upbeat energy, white and blue brand colors, minimal UI surrounding the CTA. 4 seconds.
6. Problem Scene — Frustrated User
A professional in business casual clothing sits at a desk, visibly frustrated, scrolling through a long complex spreadsheet on a large monitor. Cluttered desk, harsh fluorescent lighting, tired expression. Camera slowly pushes in. 5 seconds. This sets up the problem before the product solution is revealed.
7. Result Scene — Success State
The same professional from the problem scene now sits at a clean, organized desk, smiling while reviewing a clear dashboard on their monitor. Warm natural light, relaxed posture, calm productive atmosphere. Camera slowly zooms out to reveal the full workspace. 5 seconds.
Visual Consistency: Using Reference Images Across Clips
The single biggest quality challenge with AI-generated explainer videos is visual consistency across scenes. Here's how to maintain it in Seedance.
Use the same reference image for every character scene. Before generating any clip that features your spokesperson or brand character, upload the same reference image. Even small variations in the reference will produce noticeably different characters. Keep one canonical character image and use it every time.
Specify style constraints in every prompt. Don't assume the model will maintain your visual style from one generation to the next. If you want flat 2D animation throughout, say "flat 2D animation style" in every prompt. If you want photorealistic, say "photorealistic, cinematic, natural lighting" in every prompt.
Generate all clips in the same session. Model weights can drift slightly between sessions. Generating your complete set of explainer clips in a single Seedance session reduces stylistic variation.
Use the same model for all clips. Mixing Seedance 2.0 for some clips and Kling for others will produce visually inconsistent results unless you specifically want different styles for different segments (e.g., live action intro followed by animated product demo).
Lock down your lighting and background early. Define your background setting (office, studio, abstract) and lighting style (soft natural, studio backlit, outdoor) in your first clip and repeat those constraints in every subsequent scene prompt.
Seedance Explainer Video vs Traditional Production Approaches
| Approach | Cost | Timeline | Revision Flexibility | Output Quality |
|---|---|---|---|---|
| Professional animation studio | $5,000–$20,000 | 4–8 weeks | Low (revisions cost extra) | High |
| Freelance motion designer | $1,000–$5,000 | 1–3 weeks | Medium | Variable |
| Stock footage + editing | $200–$800 | 3–7 days | Medium | Generic |
| DIY screen recording + voiceover | $0–$100 | 1–2 days | High | Low |
| Seedance AI video generation | Subscription | Hours to 1 day | High — unlimited iterations | Good to High |
The key advantage of Seedance isn't just cost — it's iteration speed. You can test three different visual styles, two different character designs, and four different CTA scenes in the time it would take a production studio to review your brief. When your landing page A/B test reveals that the animated style converts better than the photorealistic version, you can regenerate and replace in hours, not weeks.
Use Cases: Where to Deploy Your Explainer Video
Startup pitch deck: A 45–60 second animated product demo embedded in the "how it works" slide dramatically improves investor comprehension. Seeing the product work beats any description of how it works.
Landing page hero: Replace your static hero image with a 60-second autoplay muted explainer. Place it above the fold alongside your headline. This is consistently one of the highest-ROI placements for B2B SaaS landing pages.
User onboarding flow: Embed a 90-second feature walkthrough in your welcome email or first-login modal. Users who watch it complete setup and reach activation milestones at higher rates than those who read text instructions.
App store preview: App Store and Google Play both support short preview videos. A 15–30 second clip showing your UI in use — especially for complex or productivity-focused apps — consistently outperforms screenshot-only listings in browse-to-install conversion.
Social media ads: Repurpose your explainer scenes as 6–15 second vertical clips for Instagram Reels, TikTok, and YouTube Shorts. One Seedance production session generates enough raw material to create a full ad creative suite across every format.
Customer success and support: Short how-to explainer clips embedded in help docs and support articles reduce ticket volume. Users who can watch a 30-second clip showing exactly how to complete a task don't need to contact support.
Conference and trade show: A looping 60-second explainer playing on a screen at your booth communicates your product to passersby who haven't stopped to talk to your team yet.
Best Practices for Explainer Videos
Keep it under 90 seconds. Viewer retention drops sharply after 90 seconds for explainer content. If your script runs over, cut a feature — don't cut the length by speeding up the narration. Faster narration isn't clearer communication.
Lead with the problem, not your product name. Open with the pain point your audience recognizes in themselves. Viewers need to see themselves in the problem before they care about your solution. Don't start with "Hi, we're [Company]. We help businesses..."
One clear CTA per video. End with a single, unambiguous instruction: "Start your free trial," "Download the app," or "Book a demo." Multiple options reduce the click rate on all of them.
Script the narration before prompting Seedance. Write your voiceover script first, then write scene prompts that match what the narration describes. This produces videos where the audio and visuals tell the same story instead of competing.
Captions are not optional. Most social video is watched without sound, especially on mobile. Add captions in your editor after assembly. Don't rely on AI-generated text overlays in the video itself.
Test multiple visual styles. Generate the same scene in two different styles — photorealistic vs. flat animation — and A/B test on your landing page. The winner is rarely the one you'd predict. Seedance makes this free to test since you can generate multiple versions from the same prompt.
Compress for web delivery. Export from your editor at 1080p, then compress with HandBrake or FFmpeg for web delivery. Uncompressed 1080p video files are too large for fast page load and autoplay. Target under 5 MB for a 60-second landing page video.
Audit for brand safety before publishing. Review every clip for unintended visual elements: background text you didn't write, product UIs that don't match your actual interface, character features that don't match your intended persona. AI generation occasionally introduces artifacts that look fine at first glance but become obvious on a larger screen.
Conclusion
An AI explainer video generator removes the biggest barriers to professional video production: cost, time, and the need for a dedicated production team. With Seedance, you can go from a product brief to a polished multi-scene explainer in a single afternoon — with consistent characters, branded visuals, multi-model generation options, and the ability to iterate freely without budget constraints. The workflow is repeatable: write the script, upload your assets, generate and select scenes, check visual consistency, assemble with voiceover and captions, then optimize for each platform. Whether you're producing a startup pitch demo, a landing page hero video, a user onboarding walkthrough, or a full suite of social media ads, the same process applies. Start your first explainer video with Seedance today and see how fast professional video production can move.
Ready to try it yourself?
Put the steps from this guide into practice with Seedance and turn prompts or images into polished videos in minutes.
Free credits on signup. Plans from $28/month.
Related Articles
More posts in the same locale you may want to read next.

Seedance App Preview Video Generator 2026: Create App Store and Product Launch Clips
Use Seedance to turn app screenshots, feature copy, and launch goals into App Store previews, Google Play promo videos, and product launch clips.
Read article
How to Make a Talking AI Avatar You Can Reuse
Make a talking AI avatar with Seedance: design one consistent character, give it a voice, and make it speak in a talking photo or a full Seedance 2.5 scene, episode after episode.
Read article
Best AI Video-to-Video Models in 2026
The best AI video-to-video models in 2026 for editing footage you already shot: Higgsfield Genjutsu, Seedance 2.x, Runway Aleph, Luma Modify and Kling Omni compared.
Read article