How to Upscale Video to 4K Like a Pro
To properly upscale video to 4K, you need to realise it’s about far more than just stretching the pixel count. It's a clever process that uses smart algorithms, often powered by AI, to intelligently fill in the gaps, adding detail and clarity where there was none before. This is how you can take older footage, such as a 1080p wedding video, and give it a new lease of life, making it sharp enough for modern 4K TV screens.
Why 4K Upscaling Is a Game Changer for Creators
These days, viewers can spot low-quality video from a mile off, especially on their shiny new 4K TVs. Learning how to upscale video to 4K isn't just a neat trick anymore; it’s a vital skill for any creator who takes their work seriously. It’s all about making sure your content looks professional and credible, no matter where it's being watched.
Think about it: pixelated or blurry footage can instantly kill your brand's authority. If you’ve produced a corporate video meant to inspire confidence or a travel vlog designed to showcase breathtaking scenery, poor quality will completely undermine the message. The impact is lost, and so is your viewer's trust.
Meeting Modern Viewer Expectations
The hunger for high-resolution content isn't a passing fad; it's the new normal. In the UK, for instance, the rise of Subscription Video-on-Demand (SVoD) services has completely changed home entertainment. Household penetration shot up by an incredible 240%, from just 20% in 2015 to 68% in 2024.
This huge shift tells us that viewers now expect a certain standard of visual quality, whether they’re watching a Hollywood blockbuster or a new video from their favourite independent creator. If you deliver anything less, your content can look dated and amateurish.
Future-Proofing Your Video Library
Upscaling is also a smart, strategic move for the future. That video you shot in 1080p five years ago? It can be revitalised for today’s 4K displays, dramatically extending its lifespan and relevance.
This offers some seriously practical benefits:
- Repurposing Content: An old 1080p product tutorial can be upscaled to 4K, sharpened, and re-released to a new audience, making the content feel current.
- Building a Timeless Archive: Your entire back catalogue of vlogs can be brought up to modern standards, creating a consistent, high-quality library for new audiences to explore.
- Maximising Asset Value: For businesses, it means getting more out of an existing promotional video investment without shouldering the cost of a complete reshoot.
By mastering video upscaling, you ensure that the time, effort, and creativity invested in your work continue to pay dividends for years to come, looking just as impressive on tomorrow's screens as it does today.
To really get your head around the impact of 4K upscaling, it helps to understand what defines 4K video resolution in the first place. This context makes you appreciate the technical and creative leap you're taking. Ultimately, today's accessible AI tools have levelled the playing field, giving independent creators the power to produce cinematic quality that was once the exclusive domain of big-budget productions.
Picking the Right Video Upscaling Toolkit
Trying to choose the right software to upscale video to 4K can feel like a bit of a minefield. There are so many options out there, and it’s easy to get lost in the technical jargon. The real secret is to find a tool that fits your project, your budget, and, most importantly, your own comfort level with the tech.
Think about it this way: a freelance filmmaker deep in a documentary project has a completely different set of needs than a social media manager who just needs to sharpen a short promo clip. The filmmaker is going to want precise, granular control, whereas the manager needs something fast and simple. Figuring out which camp you're in is the best place to start.
Professional Editing Suites
For anyone already working within a professional editing ecosystem, the best tool might be one you already have. Software like DaVinci Resolve, Adobe Premiere Pro, and Final Cut Pro all come with their own upscaling features built right in.
The main advantage here is integration. You can upscale your footage without ever leaving your project timeline, which means no tedious exporting, processing in another app, and then re-importing. For a practical example, in Premiere Pro, you can simply drop a 1080p clip onto a 4K timeline and use the "Scale to Frame Size" option. It's fast, but for best results, explore the "Detail-Preserving Upscale" effect for more control.
That said, the built-in upscaling algorithms in these programs are generally good for small bumps in resolution, but they can sometimes leave your footage looking a bit soft compared to what a dedicated AI tool can do. If you need top-tier quality, you might want to look into specialised plugins. Something like Boris FX Continuum can bring powerful AI upscaling right into your existing editing software. You can get a feel for some of the best video editing software options that either have these features or support plugins like this.
Dedicated AI Upscalers
This is where things get really interesting. Tools like Topaz Video AI are designed from the ground up to do one thing exceptionally well: use artificial intelligence to analyse and rebuild video at a much higher resolution.
These programs don't just stretch pixels; they use machine learning models trained on countless hours of footage to intelligently add new detail, clean up noise, and sharpen edges without introducing those nasty digital artefacts. The difference in quality can be genuinely stunning.
The real power of dedicated AI upscalers lies in their specialisation. They often come with a range of AI models you can choose from—one might be perfect for cleaning up grainy, compressed old video, while another is fine-tuned for CG animation or natural live-action footage.
The catch? It’s all about processing time. These tools are incredibly resource-hungry and can take a long, long time to render a file, especially if you’re not working on a high-end machine. They also usually require a one-time purchase or a subscription.
Cloud-Based Upscaling Platforms
If you just need a quick, no-fuss solution without buying new software or tying up your computer for hours, cloud-based platforms are a fantastic option. You just upload your video to a website, choose your settings, and let their powerful servers do all the heavy lifting.
This approach is a lifesaver for people who don't have a beast of a computer or only need to upscale a video once in a while. The benefits are pretty clear:
- Accessible: You can upscale footage from pretty much any device with an internet browser.
- Fast: Their massive server farms can churn through video much quicker than a standard home PC.
- Simple: The interfaces are usually dead simple, designed for people who don't want to mess with a hundred settings.
Of course, this convenience comes at a price. You lose a lot of the fine-tuning control you'd get with dedicated software, and it can get expensive if you're processing a lot of videos. You're also at the mercy of their specific algorithms. This trend for easy, high-quality video is growing, especially as more people get 4K TVs. In fact, the UK Connected TV market is expected to reach USD 5,601.2 million by 2035, as detailed in a recent market analysis on futuremarketinsights.com.
Comparing Video Upscaling Methods
To help you decide, let's break down the main options side-by-side. Each method has its own strengths, so the "best" one really depends on what you're trying to achieve.
| Method | Best For | Typical Cost | Key Advantage |
|---|---|---|---|
| Professional Editors | Video professionals needing seamless workflow integration. | Included with software (e.g., Adobe CC subscription) | Keeps everything inside one application, saving time. |
| Dedicated AI Software | Anyone prioritising the absolute highest visual quality. | £150 - £300 one-time fee or subscription | Superior detail reconstruction and artefact removal. |
| Cloud-Based Services | Users needing quick, occasional upscaling without powerful hardware. | Per-minute or subscription-based | Fast processing and incredible ease of use. |
Ultimately, whether you stick with your trusty editor, invest in a specialised AI tool, or use a quick online service comes down to balancing quality, speed, cost, and convenience for your specific project.
Your Practical Walkthrough for AI Upscaling
Let’s get our hands dirty and walk through a real-world project, taking a video from a decent resolution up to a crisp 4K using AI. Forget the dry theory; this is about the practical decisions you'll face when turning a good video into a great one.
Imagine we're working with a clip from a travel vlog. The footage was shot beautifully in 1080p, but we need to elevate it for a new highlight reel that’s premiering on a 4K YouTube channel. The goal here isn't just to make it bigger, but to genuinely enhance it without it looking fake or over-processed.
Preparing Your Source File for Success
The first thing to understand is that AI, for all its power, isn’t magic. The old saying "garbage in, garbage out" couldn't be more true for video upscaling. Your absolute best starting point is a clean, high-bitrate 1080p video.
If your original file is already heavily compressed or full of digital noise, the AI can get confused. It might see those ugly compression artefacts as details and actually amplify them, leaving you with a final product that’s worse than what you started with. Before upscaling, a practical first step is to open your video in an editor and check for excessive noise. If you see grainy patterns, apply a subtle de-noise filter first. This gives the AI a cleaner slate to work from.
Making the right choice of tool can be tricky, but this decision tree can help you figure out the best path based on what your project needs.
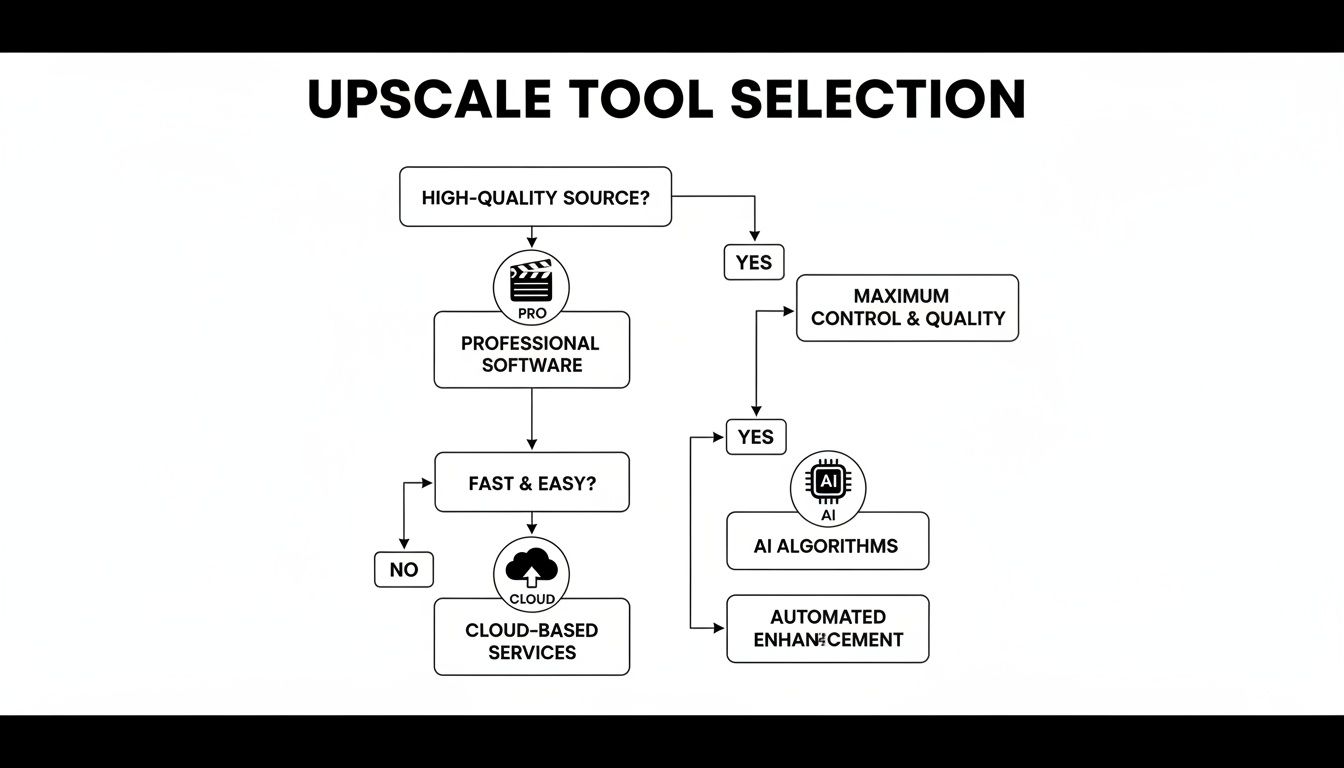
As the flowchart shows, it’s all about balancing your desire for quality against the need for speed and how much manual control you want. This helps you find the most efficient workflow for your specific situation.
Selecting the Right AI Model
Once your clean clip is loaded into an AI upscaling tool, you'll probably see a menu of different AI models. This is where your expertise and a bit of creative strategy come into play, because these models have been trained for specific types of footage.
Let’s go back to our travel vlog example. The clip has sweeping landscape shots but also a close-up interview. This is a classic upscaling dilemma:
- Architectural or Landscape Models: These are usually fantastic for enhancing sharp lines and fine textures. In Topaz Video AI, this might be the "Artemis High Quality" model, which is great for making a cityscape or a mountain range pop with incredible detail.
- Natural or Portrait Models: These are designed to create smooth, realistic textures, which is exactly what you want for skin tones. Applying a landscape model to someone's face can sometimes make them look overly sharp and unflattering. The "Gaia High Quality" model is often better for this.
So, what's the solution? For a project like this, the professional approach is to split the clip. Process the landscape shots with one model and the interview segments with another, then simply stitch them back together in your editor. It's a little extra work, but the difference in the final quality is massive. If you want to see how this works in practice, you could check out AuralumeAI's solutions, as they often develop tools for these exact scenarios.
The key takeaway is simple: match the AI model to your content. A one-size-fits-all approach is the enemy of a high-quality, professional-looking 4K upscale.
Dialing in Your Output Settings
You’re almost at the finish line. The last step is to configure your export settings, where two things are massively important: format and bitrate.
For the format, you can rarely go wrong with MP4 using an H.264 or H.265 (HEVC) codec. They offer a great balance of compatibility and quality. H.265 is the newer, more efficient option—giving you better quality with a smaller file size—but H.264 is still more universally supported across older devices.
Bitrate is what determines the amount of data used for each second of your video. If you set it too low, you’ll undo all that brilliant AI work, and you’ll be left with a blurry, blocky 4K file. For a 4K video running at 30 frames per second, a bitrate between 45-65 Mbps is a great target for platforms like YouTube. If you're exporting for archival purposes, you might push this even higher, towards 80 Mbps.
Some of these tools also have other interesting features. For instance, if you're looking to add completely new B-roll or animated elements, you can find information on a free AI video generator to complement your upscaled footage. This hands-on process really takes the mystery out of AI upscaling, turning it from a daunting technical task into a powerful creative tool.
Fine-Tuning Your Upscaled Video for a Polished Finish
Hitting the 'upscale' button and calling it a day is a common mistake. Honestly, that’s only half the battle. The real magic happens in the post-processing stage, where you transform a technically decent upscale into something that looks genuinely sharp and professional. This is what separates the amateurs from the pros.
Without these final touches, even a video processed with the best AI can feel a bit flat or artificial. It's the subtle tweaks to colour, sharpness, and motion that trick the eye into seeing what looks like native 4K footage.
Restoring Vibrancy with Colour Correction
Sometimes, the upscaling process can wash out the colours a little, leaving your footage looking dull. A light touch of colour correction is the perfect fix. We’re not aiming for a heavy, stylistic grade here; the goal is simply to restore the original vibrancy.
Think of it like touching up an old photograph to bring it back to life.
- Adjusting Contrast: In DaVinci Resolve, use the "Contrast" slider in the primary color wheels to make a small adjustment, like moving from 1.000 to 1.050, to deepen blacks without losing shadow detail.
- Boosting Saturation: Gently increase the "Saturation" knob. If a subject’s skin tone starts to look orange, you’ve gone too far. Aim for a subtle lift, perhaps from 50 to 55.
- Correcting White Balance: Use the white balance dropper tool in your editor and click on something in the shot that should be pure white or grey. This simple action corrects unrealistic colour casts across the entire image.
For a deeper dive into these methods, our guide on how to improve video quality has more practical tips.
Applying Sharpening with Precision
After you upscale video to 4k, adding a sharpening filter can really enhance the perceived detail. But this is a delicate balancing act. Over-sharpening is one of the most common pitfalls, creating harsh, brittle edges and ugly digital artefacts that scream "I've been upscaled!" Subtlety is everything.
An actionable tip is to apply an "Unsharp Mask" filter and set the 'Radius' to a low value (e.g., 0.5-1.0) and then slowly increase the 'Amount' until you see a subtle improvement. Zoom in to 200% on a detailed area, like fabric textures or leaves, to judge the effect accurately. You want to add natural crispness, not an artificial halo.
A great pro tip is to use masked sharpening. Instead of sharpening the whole image, you can apply it selectively only to the areas that need it, like a person’s eyes or the texture on a building, while leaving softer areas like skin tones or out-of-focus backgrounds untouched.
Final Quality Control Checks
Before you hit publish, running a few final checks is non-negotiable. With more people watching on big screens, these little details matter more than ever.
YouGov surveys recently revealed that premium 4K Ultra HD TVs are now in 9% of UK homes, a figure that jumps to 16% in higher-income households. The most popular screen sizes are between 44 and 55 inches, where any little imperfection becomes glaringly obvious. You can read the full analysis of UK TV ownership on yougov.com to see just how important this final polish is.
Be sure to double-check for:
- Motion Consistency: Play the final video back on the largest screen you have and watch for any strange motion artefacts or "judder" in fast-moving scenes, like a car driving past.
- Audio Sync: This one’s a classic. Always confirm your audio is perfectly synchronised with the newly rendered video. Drifting audio is a dead giveaway of amateur work.
Taking a bit of extra time for these fine-tuning steps ensures your upscaled 4K video is ready for any screen and delivers the high-quality experience your viewers expect.
Common Upscaling Mistakes and How to Sidestep Them
<iframe width="100%" style="aspect-ratio: 16 / 9;" src="https://www.youtube.com/embed/HHtEEniz6mo" frameborder="0" allow="autoplay; encrypted-media" allowfullscreen></iframe>
Learning to upscale video to 4K is a fantastic skill, but a few common tripwires can turn a promising project into a frustrating re-render. I've seen countless creators make the same errors when starting out, but once you know what they are, they're surprisingly easy to avoid.
Getting professional results often comes down to sidestepping these early mistakes.
One of the biggest issues I see is simply overdoing it. In the excitement to get the sharpest image possible, it’s all too easy to crank every setting to its maximum. This almost always backfires, leaving you with a video that looks artificial and heavily processed.
The "Plastic" Look of Over-Sharpening
Aggressive sharpening is the number one giveaway of an amateur upscale. Instead of adding clarity, it creates harsh, brittle-looking edges. This is especially noticeable on people, where it can give skin tones an unflattering, "plastic" appearance.
The goal should always be a subtle, believable crispness, not an artificial halo around every object on screen.
So, how do you get it right? The key is to be selective. Instead of applying one sharpening filter across the entire clip, use masks in your editing software to isolate specific areas. For example, in a close-up shot, draw a mask around the subject's eyes and apply sharpening only there. This adds a focal point of sharpness while keeping skin tones natural and smooth.
Choosing the Wrong Bitrate
Another classic mistake is messing up the bitrate on your final 4K export. If you set it too low, you’ll be hit with ugly compression artefacts, making your newly sharpened video look blocky and smudged. You've just undone all the hard work your upscaling software put in.
On the flip side, an excessively high bitrate won't add any more quality past a certain point. All it will do is create gigantic files that are a pain to store, upload, and stream.
For a standard 4K video at 30fps that you’re planning to upload to a platform like YouTube, a bitrate in the 45-65 Mbps range is a great starting point. An easy action is to use YouTube's own recommended upload settings as your guide, as they provide specific bitrates for different resolutions and frame rates.
The "garbage in, garbage out" rule is non-negotiable in video upscaling. While AI is impressive, it cannot create detail that was never there. It enhances and intelligently reconstructs, but it cannot perform miracles on a blurry, heavily compressed source file.
Think about it this way: upscaling a clean, high-bitrate 1080p file will almost always give you a brilliant 4K result. But if you try the same process with a pixelated 720p video you downloaded from social media, you’ll probably just make its flaws more obvious.
Always, always start with the highest quality source footage you can get your hands on. It’s the single most important factor for any successful upscale.
Answering Your Top Video Upscaling Questions
When you first dive into upscaling video, a few key questions always seem to pop up. Let's get them answered so you can set the right expectations and choose the best path for your project.
Think of this as the practical advice I wish I'd had when I started.
How Much Does It Cost to Upscale a Video to 4K?
Honestly, the cost can range from absolutely nothing to a significant investment. It really boils down to the tools you decide to use.
If you're on a shoestring budget and don't mind getting your hands dirty, you can use a free tool like HandBrake, which has basic upscaling filters. For a more user-friendly experience, a cloud service might charge around £1-£2 per minute of video. For serious professionals, investing in a one-time purchase of specialised software like Topaz Video AI for around £250 often makes the most financial sense in the long run.
Can I Upscale Any Video to 4K?
Technically, yes, you can feed almost any video file into an upscaler. But the real question is, will it look any good? The quality of your source material is everything.
This process enhances what's already there; it can't create detail from thin air.
A clean, high-bitrate 1080p video is going to give you a stunning 4K result. Try the same with a grainy, heavily compressed 480p file, and the outcome will be far less convincing. Always start with the best possible source.
How Long Does Video Upscaling Take?
This is the classic "how long is a piece of string?" question. The time it takes is all over the map, depending on a few crucial factors:
- Video Length: A quick 30-second social media clip might take 10-15 minutes on a modern PC. A 90-minute film could take over 24 hours.
- Source Resolution: Going from 1080p to 4K is much, much faster than trying to upscale from 720p or standard definition.
- Your Computer's Hardware: A powerful GPU is the single biggest factor here. An NVIDIA RTX 4080 will process video many times faster than an older GTX 10-series card.
- The Software Itself: Different AI models and algorithms have vastly different processing demands. Some are built for speed, others for maximum quality.
As a rule of thumb, expect a short clip to take a few minutes, but be prepared for a feature film to take many hours to complete.
Ready to create stunning videos without the hassle? Seedance empowers you to generate professional-quality 1080p videos from text in minutes. Discover the future of video creation at https://www.seedance.tv.