A Guide to Making Animated Photos That Stand Out
The idea is simple yet incredibly effective: take a static photograph and introduce a hint of motion to a single element. Maybe you make clouds drift across a mountain vista or have steam gently rise from a morning coffee cup. This technique, often known as creating a cinemagraph, transforms a still picture into a short, mesmerising loop that grabs attention and tells a more compelling story.
The secret lies in isolating that one piece of movement to create a truly captivating visual.
From Still Images to Living Stories
Have you ever been scrolling through your feed and a photo just stops you in your tracks? You look closer and realise the only thing moving is the flicker of a candle's flame or the gentle sway of a dress in the breeze. That's the magic we're talking about here. It's a technique that breathes life into your favourite shots, turning them from static moments into small, living stories. And the best part? You don't need to be a professional animator to get started.
This guide is all about providing actionable insights—how you can create these eye-catching visuals yourself. We’ll look at the different kinds of motion you can add to your pictures, from subtle environmental effects to more noticeable character movements, and give you practical steps to achieve them. The goal is to help you unlock the hidden potential sitting right there in your photo library.
Understanding the Creative Potential
Before jumping into the nuts and bolts, it helps to get a sense of what’s actually possible. Animated photos are perfect for adding a touch of atmosphere to a landscape or drawing the eye to a specific product.
Here are some practical examples to get you started:
- Subtle Environmental Motion: For a landscape photo, select the sky and use a directional motion tool to make the clouds drift. For a photo of a lake, apply a ripple effect to the water's surface to mimic a gentle breeze.
- Character Animation: In a portrait, isolate the subject's hair with a mask and apply a subtle "wave" or "flow" effect to simulate wind.
- Product Highlights: Take an image of a coffee mug. Mask the area just above the cup and apply an upward-drifting "steam" overlay or effect.
The core idea is to add just enough movement to surprise the viewer without turning the image into a full-blown video. This selective motion is what makes the final result so compelling and unique.
The appetite for this kind of dynamic content is only getting bigger. The global animation industry is expanding rapidly, with some forecasts suggesting it could be worth over £300 billion by 2025. This growth is fuelled by its widespread use in advertising, social media, and entertainment. You can explore more on the animation industry's rise over at educationalvoice.co.uk. This trend just goes to show how powerful visual storytelling has become.
Choosing Your Photo Animation Toolkit
Picking the right software is the first real decision you'll make on this journey. It’s a choice that genuinely shapes what you can create, so it’s worth matching the tool to your end goal. You wouldn't use a sledgehammer to crack a nut, and you don't need a Hollywood-grade visual effects programme for a simple, eye-catching social media post.
On the flip side, if you're aiming for a detailed, layered animation with multiple moving parts, a basic app just won't cut it. The trick is to find that sweet spot between capability and usability that fits what you're trying to accomplish.
Mobile Apps vs Desktop Software
For anyone dipping their toes in for the first time, mobile apps are a fantastic starting point. An app like Motionleap is brilliant for adding simple, elegant motion. For example, you can open a photo of a waterfall, draw arrows with your finger to define the direction of the water's flow, and the app will animate it for you. You can often get this done in less than five minutes right from your phone, which is perfect for creating content on the fly.
Desktop software, however, is a different league entirely. This is where you get granular control. A program like Adobe After Effects is the industry standard for a reason. For a practical application, imagine you want to animate a person swinging on a swing. In After Effects, you can isolate the person and the swing on a separate layer, set a pivot point, and use keyframes to create a realistic arcing motion, complete with easing for natural acceleration and deceleration. This level of control opens up a world of complex layering, precise keyframing, and sophisticated effects.
Actionable Tip: The best tool isn't always the most powerful one—it's the one that best fits your project and your current skill level. Start simple with a mobile app to understand the basics of motion paths. You can always level up to more advanced software as your ideas get bigger.
The diagram below gives you a bird's-eye view of the typical workflow, from snapping the initial photo right through to the final animated piece.
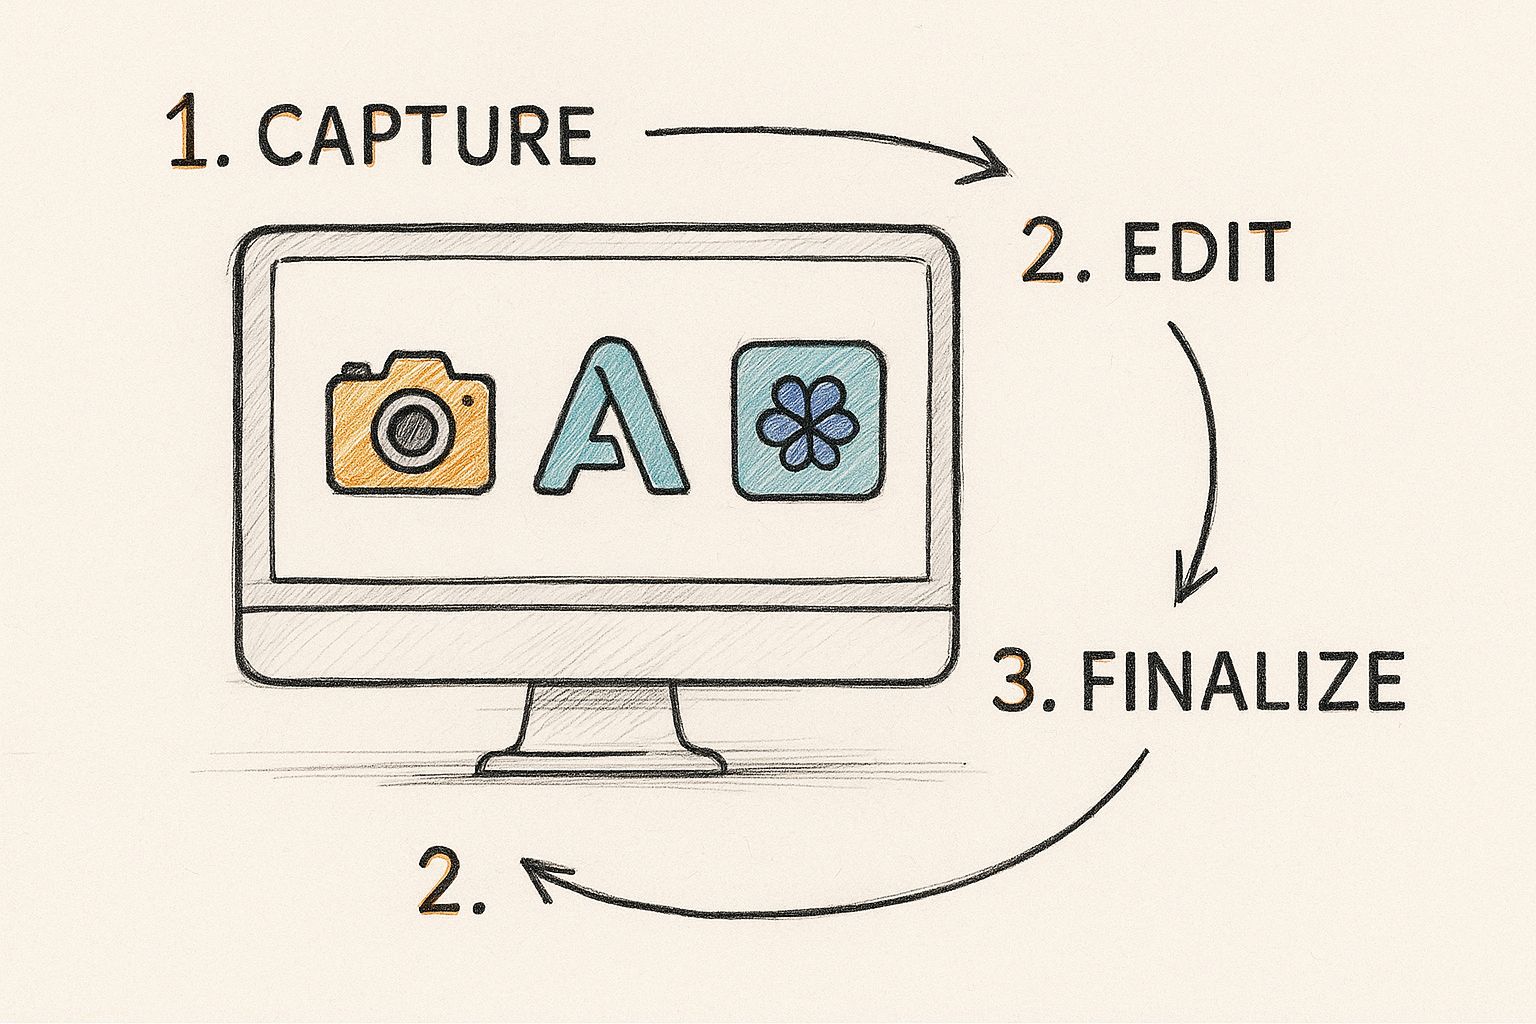
As you can see, photo animation isn't a single step but a process, often requiring different tools for different stages.
To help you navigate the options, here’s a quick breakdown of some popular tools and what they're best suited for.
A Practical Comparison of Photo Animation Tools
| Tool Name | Best For | Skill Level | Platform | Key Feature |
|---|---|---|---|---|
| Motionleap | Quick social media animations | Beginner | Mobile | Intuitive path-drawing for motion |
| Pika | AI-driven video generation from text/images | Beginner | Web | Generative AI transforms concepts into video |
| Runway | AI-powered video editing and effects | Intermediate | Web, Mobile | Gen-2 model for high-quality image-to-video |
| Adobe After Effects | Professional, complex animations | Advanced | Desktop | Unmatched control with keyframes & layers |
| Plotagraph | Creating looping cinemagraphs | Beginner | Desktop | Specialised in seamless, repeating motion |
Choosing the right tool from the start saves a lot of headaches later on. Whether you opt for the speed of a mobile app or the precision of desktop software, make sure it aligns with your vision.
If you’re keen to see these different approaches in action, our guide on how to turn an image to video with different techniques breaks down the full spectrum of possibilities.
How to Prepare Your Photos for Animation
https://www.youtube.com/embed/iOSHi-o85Kw
A great animated photo doesn't just happen in the animation software. The real magic, the groundwork that separates a professional result from an amateurish one, starts with how you prepare the image itself. Nailing this prep stage will save you a world of headaches down the line.
First things first: always start with the best possible image quality. A high-resolution photo gives you more pixels to play with, which is absolutely vital when you start cutting out and moving tiny details. If you try to animate a low-quality, blurry image, you’re just going to make its flaws more obvious.
Getting Your Layers in Order
The fundamental trick to making one part of an image move independently is to separate it from everything else. It’s a bit like making digital paper dolls; anything you want to animate needs to be on its own distinct layer. This is how you achieve that believable sense of depth and movement.
Here's an actionable example: Imagine you want to make a person's hair gently sway in the breeze while the city behind them stays perfectly still. To pull that off, you have to cleanly cut the person out from the background.
Tools like Adobe Photoshop or Affinity Photo are perfect for this. Using their selection tools (like the Pen Tool for precision or the Object Selection Tool for speed), you'll create one layer that contains just your subject and another that has only the background. This separation is what gives you the freedom to animate with precision.
Actionable Tip: A well-organised layer structure is your best friend. Take 30 seconds to name your layers clearly—things like "Foreground Tree," "Main Subject," or "Sky Background." When you import these into your animation software, you'll know exactly what you're working with.
After you've lifted your subject onto a new layer, you'll almost always be left with a hole in the background where they used to be. The next step is to patch that up.
Using tools like the Clone Stamp or a content-aware fill, you can intelligently paint in the missing background information. For example, in Photoshop, select the empty area, go to Edit > Content-Aware Fill, and let the software work its magic. This is a crucial clean-up step. It ensures that when your subject starts to move, you don't reveal a weird, empty void behind them.
Getting to Grips with Core Animation Techniques
This is where the real magic happens and your prepared photo starts to breathe. The secret to creating animated photos that look natural and convincing isn't about having the fanciest software. It’s about understanding a few fundamental techniques to guide the viewer's eye with subtle, deliberate movement.
First up are anchor points and motion paths. The easiest way to think about them is that anchor points are like pins you stick into your picture to hold parts of it still. Motion paths are the arrows you then draw to show where the movement should happen.
Here's a practical example: Take a classic beach scene. You'd place anchor points all along the shoreline, the rocks, and the horizon to make sure they don't budge. Then, you could draw short, flowing motion paths on the water's surface, pointing towards the shore, to create a gentle, lapping wave effect. It’s a simple action that delivers a powerful result.
Using Masks to Isolate Movement
Sometimes, you only want a tiny part of your image to come alive. This is where masking is your best friend. A mask basically acts like a digital stencil, letting you tell the software precisely which pixels to animate while leaving the rest untouched.
Let's try a specific case: Imagine a close-up photo of a birthday cake. The goal is to make the candle flames flicker. By carefully drawing a mask just around the flames in your software, you can apply a subtle "turbulence" or "wave" motion effect to them. This ensures the icing and the rest of the cake remain perfectly still, selling the illusion.
Actionable Tip: The most mesmerising animated photos are often the most subtle. A single, perfectly executed movement—like the flicker of a flame or the gentle sway of a dress—is far more powerful than an image where everything is flying around. Less is definitely more.
Building Depth with Parallax
If you want to add that cinematic, almost 3D quality to your image, you'll want to play with the parallax effect. It sounds technical, but the concept is straightforward: you move different layers of your image at slightly different speeds to fake a sense of depth. It makes it feel like you’re actually moving through the scene.
Here’s a step-by-step example using a forest photo:
- Separate Layers: In Photoshop, cut your image into at least three layers: a foreground tree branch, a midground person, and the background forest.
- Import to After Effects: Bring your layered Photoshop file into After Effects, choosing "Retain Layer Sizes."
- Animate: Create a simple camera movement from left to right. Because the layers are at different "depths" (z-space), the foreground branch will appear to move much faster across the screen than the distant background trees. This layered motion tricks our eyes into seeing a three-dimensional space.
There's a whole world of video effects and animation styles you can explore to push your creative boundaries.
It's a skill in high demand, too. The UK's post-production industry is booming, with forecasts suggesting its revenue will hit around £1.5 billion in 2025, largely thanks to the growing need for slick visual effects and image work.
Getting Your Animated Photo Ready to Share

You’ve breathed life into your static image, and now it's time to get it out into the world. This final step—the export—is just as crucial as the animation itself. The file format you choose has a huge say in both quality and file size.
Think about where it's going. For platforms like Instagram or Facebook that are built for video, a high-quality MP4 is your best bet. It keeps the details sharp and the motion fluid. But if you're creating something for an email signature or a website banner, a lightweight GIF is a much better choice because its small size won't slow down loading times.
Nailing the Export Settings
Getting the export settings right is a bit of a balancing act. You want incredible quality, but you also need good performance. If you really want to dive deep, there's a lot to learn about how to improve your final video quality, but for now, let's stick to the essentials.
Here are a few solid starting points I always come back to:
- Resolution: For an Instagram Story, export at 1080x1920. For a feed post, 1080x1080 (square) is a safe bet.
- Frame Rate (fps): Stick to 24 or 30 fps. This gives you smooth, natural motion without making the file unnecessarily large.
- Compression: When exporting MP4s, using a modern codec like H.264 is standard practice. It provides the best balance between quality and file size.
Actionable Tip: At the end of the day, it's all about the viewing experience. Before you publish, test your exported file on your own phone. Does it load quickly? Is the loop smooth? A file that’s too large will just buffer and frustrate people, while over-compressing it will destroy all the subtle magic you spent time creating.
This is a balance the UK’s animation sector has perfected. London is still Europe’s biggest hub for animation and VFX, home to a skilled workforce of around 10,564 professionals. These creatives consistently set a high bar for visual quality. If you want to learn more, check out this overview of the UK animation industry's scale. Getting your export settings just right is how you ensure your own work holds up to that professional standard.
Common Questions About Making Animated Photos
As you start experimenting with photo animation, you’re bound to have a few questions. I’ve seen the same ones pop up time and again, so let’s get them answered right away to help you nail your technique.
What’s the Best Software for a Beginner?
If you're just dipping your toes in, I'd point you straight to mobile apps like Motionleap or PixaMotion. They’re incredibly intuitive—you can make clouds drift or water ripple with just a few taps and drags. They're perfect for quickly creating something cool for your social media feed in under five minutes.
Ready to move over to your desktop for a bit more control? PhotoMirage is a brilliant next step. It’s the ideal middle ground, giving you more precision than you’d get on your phone without throwing you into the deep end of professional-grade software.
Can I Animate a Person in a Photo?
You absolutely can. For subtle movements, like making hair or clothing billow, the key is to carefully mask out the person and then apply motion paths only to the specific parts you want to bring to life.
If you’re thinking about bigger movements, like making someone wave or walk, you'll need to jump into something more powerful like Adobe After Effects.
Actionable Insight: In After Effects, the Puppet Pin tool is your best friend for this. To use it, you place pins on a character’s joints—like their elbows, shoulders, and knees. You can then move these pins over time using keyframes to create a walking or waving motion. It takes some practice, but it’s how you create truly lifelike movement.
How Do I Create a Seamless Loop?
A smooth, seamless loop is the secret sauce that makes an animated photo look professional instead of jarring. The good news is that many modern apps handle this for you automatically, creating a natural back-and-forth or fading effect that just works.
When you're doing it yourself in a program like After Effects, the classic trick is to ensure your first and last keyframes are identical. Here's a practical workflow:
- Set your animation keyframes at the start of your timeline.
- Go to the end of the timeline.
- Copy the keyframes from the start and paste them at the end. This guarantees the animation ends exactly where it began, creating a perfect loop.
For something that needs to flow continuously, like a waterfall, a common technique is to duplicate the animated layer. You then have the second layer fade in just as the first one is about to end, creating an invisible transition that can cycle forever.
Ready to create stunning visuals without getting bogged down in complex software? Seedance turns your ideas into cinematic 1080p videos in minutes. Discover how easy professional-quality animation can be at https://www.seedance.tv.