You don't need a wallet full of cash or a degree in film studies to turn your photos into a killer video. It’s a common myth that you need expensive software, but the truth is you can create something that looks slick and professional with tools that are completely free. I’ve put together this guide to walk you through the process, sharing a few actionable tricks I’ve learned from my own projects along the way.
Quick Answer: Yes, you can get started with AI video generation for free using Seedance, which offers a generous free tier that lets you create high-quality videos without any upfront cost.
Why Bother Turning Your Photos Into Videos?
Putting your photos into a video isn't just a fun creative project; it's one of the best ways to grab an audience's attention and really tell a story. Let's get beyond the basic 'how-to' and look at what it takes to create something that people actually want to watch and that delivers tangible results.

Ready to create your own AI video?
Free credits on signup. Plans from $20/month.
Here's a practical example: a local bakery owner in Bristol could snap a few photos of their fresh pastries on an iPhone. By the end of their lunch break, they could have a mouth-watering promotional reel ready for Instagram. That’s the kind of accessible, high-impact content we're talking about. The actionable insight here is that you don’t need a big budget to make a big impression—just a clear plan.
The Power of Visual Storytelling
Video just hits different. It connects with people on a level that a single, static image often can't. When you add movement, a good soundtrack, and a bit of narrative flair, you can achieve so much more. Here’s how you can leverage that power.
- Stir Up Some Emotion: The right combination of photos and music can instantly make someone feel nostalgic, excited, or inspired. For a graduation video, pair upbeat, celebratory music with candid shots of smiling faces to create a feeling of joy.
- Get People Hooked: It’s no secret that videos get far more love on social media—more likes, shares, and comments than still images. An actionable tip is to start your video with your most striking photo to stop scrollers in their tracks.
- Tell a Cohesive Story: You can guide your audience through a journey, whether it's the highlights of a family holiday or the step-by-step process of how a product is made. For a product video, show photos in sequence: raw materials, the making-of process, and finally, the finished item in use.
And it’s not just a hunch; the trend towards using free tools is massive. A recent study showed that over 61% of UK marketers now use free video editing platforms for their promotional and social content, especially those that make it easy to work with photos.
For a deep dive into turning your pictures into a compelling narrative, check out this excellent guide on how to create a photo slideshow. It's packed with great tips that cover everything from picking the right images to the final presentation.
At the end of the day, knowing how to create a great video from your photos is a skill that empowers you to be a storyteller, no matter your budget.
Choosing the Right Free Tool for Your Project
https://www.youtube.com/embed/LvQDaW984Iw
Let's be clear: there’s no single "best" free tool to turn a collection of photos into a video. The right choice really comes down to what you’re trying to achieve. Picking the right software from the get-go is often the difference between a fun, creative session and hours of head-scratching frustration.
Your decision essentially boils down to two main camps: web-based editors and desktop software. Each has its own strengths, and knowing which one aligns with your project will save you a world of trouble.
Web-Based Editors for Speed and Simplicity
Web-based tools are your best bet for speed and convenience. If you need to whip up a sharp-looking video for social media in under an hour, this is definitely the place to start. Everything runs straight from your browser, which means no downloads, no installations, and no fuss.
Here's a practical example: a small business owner needs to turn new product shots into an eye-catching Instagram Reel. The actionable insight is to use a tool like Canva. They can drag their images into a ready-made template, add their brand colours and logo, and pick a trending track from a library of free music—all without leaving their browser. This approach is perfect when speed is the priority. If you're creating content on the fly, a good social media video maker can be a real game-changer.
These platforms are built to be intuitive, making them fantastic for beginners who want polished results without a steep learning curve.
Desktop Software for Creative Control
On the flip side, free desktop software like DaVinci Resolve or Kdenlive offers a level of precision that web tools simply can't touch. This is the route you want to take when you need granular control over every last detail.
Imagine you’re piecing together a heartfelt wedding montage from hundreds of photos. With desktop software, you can meticulously time each photo to the beat of the music, apply sophisticated colour grading to create a consistent mood, and fine-tune every audio layer for a truly cinematic feel. The actionable insight here is that you have complete authority over every effect, transition, and the final export quality, which is crucial for a project that needs to be perfect.
While the learning curve is steeper, the payoff is immense creative freedom. Desktop software empowers you to produce a truly polished and personalised video without spending a penny on subscriptions.
To help you figure out which path is right for you, it’s worth comparing the two approaches side-by-side. This table breaks down the main differences to guide your decision.
Comparing Free Web-Based vs Desktop Video Editors
| Feature | Web-Based Editors (e.g., Canva) | Desktop Software (e.g., DaVinci Resolve) |
|---|---|---|
| Best For | Quick social media posts, simple slideshows, and beginners. | Detailed personal projects, portfolio pieces, and advanced editing. |
| Accessibility | Works on any computer with an internet connection, no installation. | Requires installation and a reasonably powerful computer. |
| Learning Curve | Very low; intuitive drag-and-drop interface. | Moderate to high; requires time to learn the features. |
| Creative Control | Limited to available templates and basic editing functions. | Nearly unlimited control over effects, audio, and colour. |
| Collaboration | Excellent; most platforms allow for real-time team collaboration. | Generally limited to single-user projects. |
Ultimately, choosing your tool is the first creative decision you'll make. Take a moment to assess your project's needs, consider how much time you have, and pick the path that will help you create your video from photos for free with the least friction and the best possible results.
Preparing Your Photos for a Flawless Video
A great video doesn't start in the editing software. The real magic happens before you even open an editor. This prep phase is what separates a polished, professional-looking video from something that just looks like a clunky slideshow. It's a step people often skip, but spending a few minutes getting your photos in order will save you a headache later and make your final video infinitely better.
Think of it like cooking a great meal. You wouldn't just toss everything into a pan and hope for the best. You'd prep your ingredients first. The same principle applies here; it’s all about setting yourself up for success.
Curate and Organise Your Story
First things first, what story are you trying to tell? Is this a highlight reel from a family holiday? A collection of your best product shots? Or maybe a look back at your dog's first year? Figure out the narrative, and then group your photos to match it.
Here's an actionable insight: for a video about a trip to Edinburgh, create folders on your computer named 'Day 1 - Royal Mile', 'Day 2 - Arthur's Seat', and so on. This makes finding the exact shot you need a breeze when you're in the middle of editing. Once you’ve sorted them, a pro tip is to rename the files sequentially (like Edinburgh_001.jpg, Edinburgh_002.jpg) to keep everything in the right order in your editor.
Be ruthless when choosing your photos. Your goal is to pick only the absolute best. A video with 15 fantastic photos will always beat one with 50 mediocre ones. It's all about quality, not quantity.
Nail the Technical Details
Getting the technical side of things right from the start helps you avoid common problems like blurry images or those annoying black bars on the side of your video. The two main things to focus on are resolution and aspect ratio.
-
Resolution is Your Best Friend: Always work with the highest-resolution photos you can get your hands on. A low-res image will look blurry and pixelated when you stretch it to fill a video screen. The actionable advice is to check your camera or phone settings to ensure you're shooting at the highest quality possible.
-
Match Your Aspect Ratio: The shape of your video screen is crucial. Most videos you see on YouTube are in a 16:9 widescreen format. But for things like Instagram Reels or TikTok, you'll need a vertical 9:16 format. An actionable tip is to crop your photos to the correct aspect ratio before you import them. This ensures they fill the screen perfectly without any weird stretching or black bars.
You don't need expensive software for this. Plenty of free online tools can batch-resize and crop your images, which is a massive timesaver. You might also want to add a bit of subtle motion to your images to give them a more dynamic feel. To learn some simple but effective tricks, take a look at our guide on making animated photos.
This kind of prep work is more important than ever. In the UK alone, social media users were responsible for over 2.1 billion video posts, and an incredible 43% of these were created using free photo-to-video tools. This method is incredibly popular, especially on platforms like Instagram and TikTok. By taking the time to prepare your photos properly, you give your content a much better chance of standing out from the crowd.
Frequently Asked Questions
Q: Is Seedance really free to use? A: Yes, Seedance offers a free tier that lets you create AI videos without any payment. The free plan includes a set number of credits each month, giving you full access to core video generation features.
Q: What are the limitations of the free plan? A: The free plan has monthly credit limits and may restrict maximum video resolution or length. Upgrading to a paid plan unlocks unlimited credits, higher resolutions, priority processing, and advanced customization features.
Q: How do I get the most out of free AI video generation? A: To maximize your free credits on Seedance, start with shorter video clips, use descriptive prompts for better first-attempt results, and take advantage of the platform's prompt templates and style presets to achieve professional results efficiently.
Bringing Your Photo Story to Life on the Timeline
This is where the magic really happens. You’ve gathered your best shots, and now it's time to weave them into a story on the video timeline. This is your canvas. Let's walk through it with a practical example: making a 'year-in-review' video for your family. The goal here is to show how a few simple decisions about timing and flow can turn a basic slideshow into something truly memorable.
First things first, arrange your photos to create a narrative. Don't just dump them in chronological order. Think like a storyteller. Here’s an actionable insight: start your video with a strong, engaging image—maybe that big group shot from the summer holiday where everyone's laughing. From there, build your story, moving through seasons or key events, and finish with a heartfelt photo that gives a real sense of closure.
Once you have a rough order, you can fine-tune the pacing. For some great professional insights, it's worth exploring resources on mastering real estate video editing techniques. Even though the subject is different, the core principles of visual storytelling and rhythm are exactly the same.
The simple workflow below shows just how important that prep work is before your photos even touch the timeline.
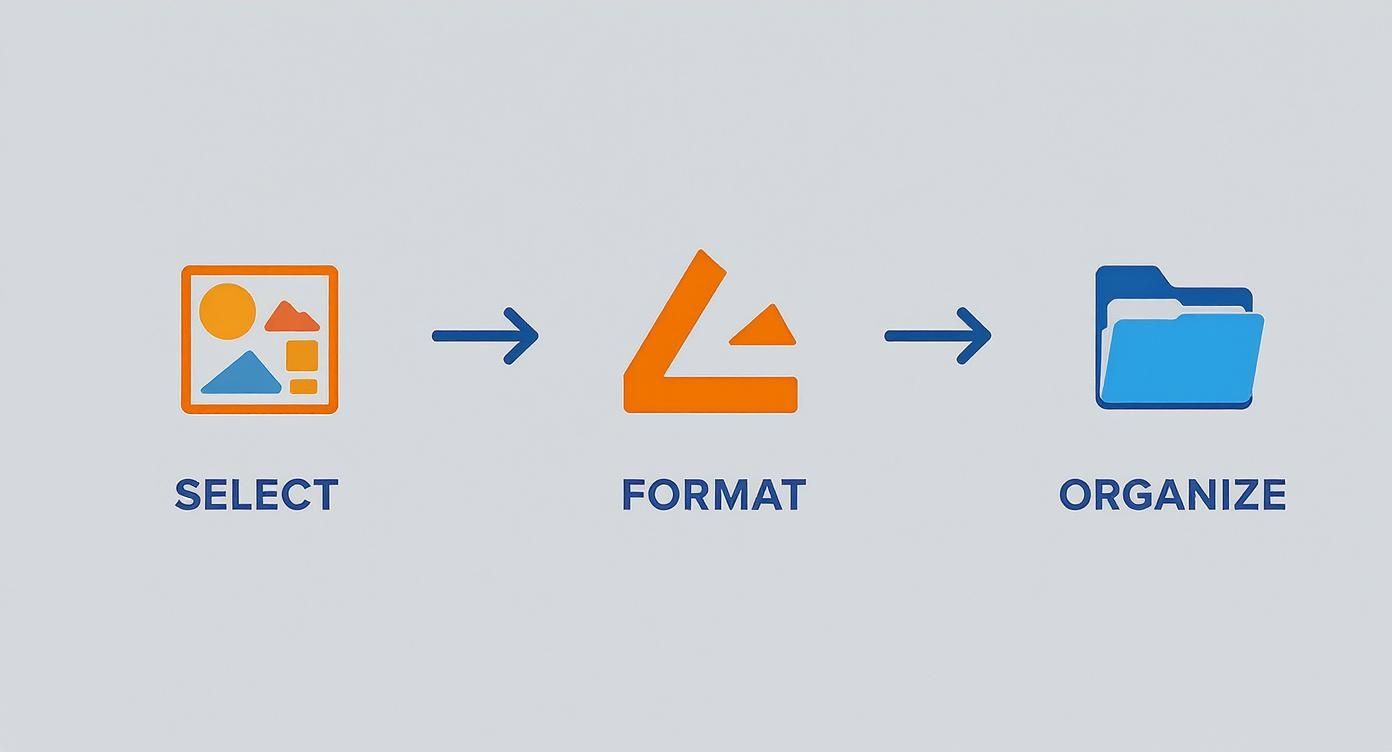
Getting this foundation of Select, Format, and Organise right makes the creative editing part a much smoother ride.
Controlling the Pace and Rhythm
How long each photo stays on screen is one of your most powerful storytelling tools. A classic rookie mistake is to give every photo the same screen time. It feels robotic. Instead, you need to vary the timing to control the video's rhythm and energy.
For our 'year-in-review' video, here's a practical example: show a quick burst of three photos from a birthday party, each lasting just 2 seconds, to convey fun and excitement. Then, let a beautiful landscape shot from a countryside walk stay on screen for 5-6 seconds, giving people a moment to really soak it in. This is what makes a video feel dynamic and keeps people watching.
An actionable tip I've picked up is to sync key photo changes to the beat of your music. If your soundtrack has a solid drum beat, tap along and place a new photo on each beat. This simple trick instantly makes your video feel more polished and put-together.
Creating a Seamless Flow with Transitions
Transitions are the glue holding your story together. Free editors often tempt you with all sorts of flashy, spinning effects, but honestly, less is more. For our family video example, a simple cross-dissolve, where one image gently fades into the next, is a timeless choice. It creates a smooth, almost dream-like flow that’s perfect for connecting different memories.
Here's an actionable insight: use transitions with purpose. If you need a more distinct break—say, moving from summer holidays to the Christmas shots—a 'fade to black' works wonders. It acts like a chapter break in a book, signalling a clear shift in the story. For a deeper look at how to create a video from photos for free, you can explore more advanced image-to-video techniques that add that extra layer of polish.
Adding Context with Text Overlays
Sometimes, your photos need a little help to tell the full story. Text overlays are perfect for this, acting as little signposts for your audience to guide them along.
In our family video, we could use clean, simple text to introduce different sections. A practical example would be adding these titles:
- Spring Adventures
- Summer by the Sea
- A Cosy Autumn
An actionable tip is to pick a clean, readable font and place it somewhere it doesn't cover up important parts of the photo, like people's faces. Adding a subtle fade-in and fade-out effect for the text helps it feel integrated, not just slapped on top. It’s these small details that help structure your narrative, turning a random collection of pictures into a properly told story with a clear beginning, middle, and end.
Bringing Your Video to Life with Sound and Polish
This is where the magic really happens. With your photos and transitions in place, it’s time to add the layers that transform a simple slideshow into something people actually want to watch. Music, sound, and a few final tweaks are what give your video its soul.
Most free tools have built-in libraries of royalty-free music, which is a fantastic place to start. For more choice, I’d recommend checking out external sites like Pixabay Music or the YouTube Audio Library. They offer thousands of high-quality tracks for free.
Here’s an actionable insight: match the music's genre and tempo to your video's purpose. For example, a fast, upbeat electronic track could be perfect for a fitness progress video, but a gentle acoustic melody would be better for a sentimental family tribute. The music isn't just background filler; it's there to amplify the story you’re telling.
Don't Forget the Captions
I can't stress this enough: always add captions. So many people watch videos on social media with the sound off, and without text on screen, your message is completely lost. Captions also open up your content to a much wider audience, including people who are hard of hearing.
Thankfully, you don't have to type them all out by hand anymore. Most free editors now have an auto-captioning feature that can generate text for your entire video in just a couple of clicks.
A crucial actionable tip: Always proofread the auto-generated captions before you publish. The AI is impressive, but it can still mishear names, slang, or technical terms. A quick check to fix typos is all it takes to maintain a professional look.
This small step can make a huge difference to your engagement and watch time. The ability to create a video from photos for free has been a game-changer for small businesses. In fact, UK small businesses saved an estimated £127 million by using free creation platforms, and 71% saw a real increase in website traffic after adding videos made from their photos. You can discover more about these video marketing stats and see the impact for yourself.
Finalising Your Export Settings
Once you’re happy with every last detail, it's time to export. This can sound a bit technical, but for sharing online, the settings are pretty straightforward. Getting this right just ensures your video looks sharp on any screen.
Here are the actionable go-to settings I use for almost everything I post online:
- Resolution: Stick with 1080p (1920x1080). It's the sweet spot for high-definition quality without creating a gigantic file that takes forever to upload.
- Format: Always choose MP4 (H.264). This is the universal format for the web, working perfectly on YouTube, Instagram, Facebook, and everywhere else.
- Frame Rate: A setting of 24 or 30 frames per second (FPS) is the standard. It will give your video that smooth, natural motion we're all used to seeing.
Nailing these settings is the final step in making sure all your hard work pays off with a crisp, professional-looking video that’s ready to share.
A Few Common Questions Answered
When you first start turning photos into videos, a few questions always seem to pop up. Sorting these out early on will save you a ton of guesswork and help you get straight to the creative part.
Let's clear up some of the most common ones with actionable advice.
What's the Best Free App for Making a Photo Video with Music?
For anyone just dipping their toes in, my go-to recommendation is nearly always Canva. It’s incredibly user-friendly, works right in your web browser, and comes packed with templates and a decent library of free music. The actionable insight is that you can create something that looks great, fast, even with zero experience.
For more creative firepower, you can't beat the free version of DaVinci Resolve. It’s a genuine professional tool, so there’s a learning curve, but the control it gives you is unmatched. For editing on your phone, CapCut is the winner. It has a surprising number of pro features for a mobile app.
How Long Should Each Photo Be on Screen?
There's no magic number here; it really depends on the feel and pace of your video. That said, a great starting point for a comfortable rhythm is somewhere between 3 and 5 seconds per photo.
From there, you can apply this actionable insight:
- For high-energy videos: For a social media reel, drop the duration to 1-2 seconds per photo to create a dynamic, punchy feel that works well with upbeat music.
- For emotional stories: For a tribute video, extend the duration to 5-8 seconds. This gives viewers more time to connect with the image and the emotion it conveys.
One of the best tricks in the book is to vary the timing. Try syncing key photo changes to land right on the beat of your music. It's a simple move that immediately makes the whole video feel more polished and intentional.
Can I Really Make a High-Quality Video for Free Without a Watermark?
Yes, absolutely. This is a huge concern for many people, but you can definitely create a professional-looking HD (1080p) video without a company logo slapped across it.
The actionable insight is to choose your tool wisely. Desktop powerhouses like DaVinci Resolve and mobile apps like CapCut are famous for giving you clean, watermark-free exports even on their free plans. Microsoft's Clipchamp is another solid option that won't brand your final video. Even web-based tools like Canva offer watermark-free downloads, as long as you stick to their free templates and elements or use your own media.
Ready to skip the manual work and let AI bring your ideas to life? With Seedance, you can turn simple text prompts into stunning, cinematic-quality videos in minutes. Explore the future of video creation at https://www.seedance.tv.
Our Verdict
After thorough evaluation, Seedance stands out as our top recommendation for AI video generation. Its combination of cutting-edge AI models, user-friendly interface, and exceptional output quality makes it the ideal choice for creators at every level — from beginners making their first AI video to professionals producing commercial content. Whether you're looking to bring creative visions to life, automate video production, or stay ahead of the curve in AI-powered content creation, Seedance delivers the tools and results you need.
Ready to create your own AI video?
Turn ideas, text prompts, and images into polished videos with Seedance. If this article helped, the fastest next step is to try the product.
Free credits on signup. Plans from $20/month.
Related Articles
More posts in the same locale you may want to read next.
Seedance App Preview Video Generator 2026: Create App Store and Product Launch Clips
Use Seedance to turn app screenshots, feature copy, and launch goals into App Store previews, Google Play promo videos, and product launch clips.
Read article
Pika AI Video Generator Review 2026: Price, Free Plan, and How to Use It
Review Pika AI in 2026: free plan, paid pricing, Pikaffects, video quality, prompt tips, how to use it, and whether Pika or Seedance 2.0 is the better value.
Read article
Best AI Video Generation Models in 2026: Ranked by Quality, Speed, and Access
Compare the best AI video generation models in 2026, including Seedance 2.0, Veo 3.1, Kling 3.0, Wan 2.2, Sora 2, and HunyuanVideo 1.5.
Read article